You press a scanner against the wall, see a flicker on the display, and still aren’t sure whether you’ve found a stud, a pipe, or just an electrical cable.
That sudden uncertainty—nailing into something you shouldn’t—is the exact problem you want solved. Most people assume any stud finder reading is definitive and trust a single pass or a cheap magnet.
This article will show you how stud finders actually evolved, how modern multi-sensor and radar tools interpret signals, and how to verify results so you can reliably locate studs, pipes, and **live wires.
You’ll finish knowing which tool to use and how to confirm its readings. It’s easier than it seems.
Key Takeaways
Section 1 — What did early magnetic finders do?
Why it matters: If you want a quick, no-battery check for studs, magnets still work.
Here’s what actually happens when you run a strong magnet along a wall: it sticks when it passes over a steel fastener, and that tells you there’s a stud nearby.
Example: hold a 1–2 inch ceramic magnet flat against drywall and slide it slowly; it’ll cling over a drywall screw every time you pass it.
How to use one:
- Move the magnet horizontally in 1–2 inch sweeps until it grabs.
- Mark each grab with a pencil dot.
- Measure 16 inches from a marked screw to estimate the next stud—stud spacing is often 16 inches on center.
A limitation: magnets only find steel, not the wood center.
Section 2 — How did capacitive electronic finders work?
Why it matters: If you want more precision than a magnet, capacitive units find edges and centers by sensing tiny electrical changes.
If you’ve ever struggled to find a stud edge with a cheap scanner, this explains why.
Example: a classic 1977-style capacitive sensor will notice a change of a few picofarads when you pass over a stud edge behind drywall.
How to use one:
- Calibrate on a blank section of wall following the tool’s instructions.
- Sweep slowly, keeping the finder flat and moving at about 1–2 inches per second.
- Mark both edges where the tool beeps, then measure the center between them—usually about 1.5 inches difference for a 2×4.
Note: calibration matters; skip it and the readings drift.
Section 3 — Why single-sensor models demand care
Why it matters: If you want accurate center marks, a single-sensor unit will make you work for it.
The difference between guessing and hitting center comes down to calibration and sweep technique.
Example: with a one-sensor scanner, you’ll often get two beeps for edges; if you mark only one and assume center, your drill can miss by an inch.
How to use one:
- Calibrate on a known empty spot.
- Sweep slowly and overlap passes by 1 inch.
- Mark both edges, then measure the midpoint for the center.
Single-sensor units are cheaper, but they force you to be deliberate.
Section 4 — What causes false positives, and how you avoid them
Why it matters: If you don’t rule out interference, you’ll waste time chasing phantom studs.
Think of the wall like a noisy radio station where moisture, metal, texture, and EMI all add static.
Example: textured plaster or a metal lath behind drywall can trigger beeps across a wide area, making every sweep look like a stud.
How to verify a reading:
- Scan the same spot with a magnet—if the magnet finds a screw, you’ve got metal.
- Use a different mode or device (magnet vs. capacitive) and compare results.
- Tap the wall—a stud sounds solid, an empty cavity sounds hollow.
If readings disagree, trust the combination of magnet plus tap test.
Section 5 — How modern multi-sensor and smart scanners improve things
Why it matters: If you want faster, cleaner wall maps, newer scanners give you clearer results with less guesswork.
The difference between old and new is processing: arrays, filters, depth testing, and radar-like algorithms reduce errors and show depth.
Example: a modern scanner with a sensor array can map studs up to 1.5 inches deep and display metal pipes or live wires on a small screen as icons.
How to use a modern scanner:
- Calibrate once on a blank wall area.
- Place the scanner flat and sweep in steady passes about 12–18 inches long.
- Read the screen for stud center, depth, and any metal or live-wire alerts, then double-check critical spots with a magnet or a small inspection hole.
Modern units cost more, but they save time and reduce accidental hits on pipes or wiring.
Early Stud Finders: How Magnets Found Nails
Here’s what actually happens when you use a magnet to find a stud in drywall: it locates the steel fasteners that hold the stud, which tells you roughly where the stud runs.
Why this matters: if you miss the stud you’ll strip a screw or lose the anchor, and that ruins hanging things. Example: imagine hanging a heavy mirror and the toggle anchor pulls out because you missed the stud; a stud-mounted screw would have held.
How the magnet method works (short, practical explanation)
- Why it works: the magnet sticks strongest where a nail or screw is closest to the drywall surface, so the magnet’s resistance pinpoints the fastener.
- Real-world example: press a fridge magnet across a bedroom wall and feel it hesitate over two steady spots about 16 inches apart — those spots are likely the staggered screws into a stud.
Steps to find studs with a magnet
- Use a small, strong magnet (rare-earth magnets like neodymium work best).
- Start at a corner or outlet — studs are commonly 16 inches on center in modern homes.
- Move the magnet slowly in horizontal sweeps, keeping it flat against the drywall.
- When the magnet resists or snaps to the wall, mark that spot with a pencil.
- Repeat the sweep 6–12 inches above and below the first mark to confirm you’ve hit the same vertical line.
- If the marks line up vertically, draw a line between them to estimate the stud center.
Why you must make multiple passes: a single magnet pull can hit a random metal item or a screw in a plate, so repeating at different heights confirms a vertical stud. Example: in an older house you might find screw heads spaced irregularly; marking three aligned points over 12–24 inches proves the stud path.
Practical tips and measurements
- Use a magnet that’s at least 1/2 inch across for more noticeable pull.
- Expect studs usually at 16 inches on center; in basements or older homes, they may be 24 inches.
- If your first two marks are 1.5 inches apart horizontally, the stud center is roughly midway, so mark at 0.75 inches from either mark.
- Don’t rely on a magnet for depth — it won’t tell you how thick the drywall is or whether the fastener is a long lag screw.
A quick troubleshooting checklist
- If you find isolated metal spots not in a vertical line, they may be conduit, metal lath, or drywall screws not into a stud.
- If you get no hits near an outlet, try sweeping wider — the stud might be behind the box or offset by an inch or two.
- If in doubt, drill a 1/8-inch pilot hole at a low mark to confirm wood behind the drywall before installing a heavy anchor.
This old magnet trick is simple, cheap, and works well when you’re patient and verify with multiple marks.
1977 Breakthrough : Franklin’s Capacitor Sensor Patent
If you’ve ever tried to find a stud with a magnet and missed, this is why.
Why this matters: using a capacitor lets you detect a stud without magnets, which means you can find studs behind thicker finishes or in metal-studded walls. For example, imagine you’re hanging a heavy mirror on an older plaster wall with lath; a capacitor-based finder can show a change where a wooden stud sits behind the plaster, even when a magnet won’t stick.
How a capacitor sensor works, simply and practically:
- A capacitor stores a tiny electrical charge between two plates; when the material between or near those plates changes, the charge behavior changes.
- In a stud finder, the sensor watches those small charge shifts as you move the device across drywall. When the device passes over a stud, the local density and dielectric properties change, and the sensor registers that as a distinct signal.
- Real example: slide the sensor horizontally across a 1/2″ drywall; expect a measurable signal shift of a few picofarads where the stud edge is, not just a vague blip.
What Robert Franklin’s patent changed and why you should care:
- Franklin described specific circuitry and calibration methods that made those tiny charge shifts reliable enough for consumer devices. That meant manufacturers could build stud finders that gave repeatable readings instead of random flickers.
- The patent set practical standards for sensitivity and for user guidance, like how to calibrate the unit on bare wall and how to interpret the signal when you cross a stud edge.
- Real example: early electronic finders before the patent might flash inconsistently on a 3/4″ plaster wall; devices using Franklin’s ideas produced steady edge indications you could trust for a bolt or screw.
How that affects the tools you use today:
- You calibrate first: place the device on a spot away from studs, press the calibration button, and wait the specified 1–3 seconds the manual tells you. This sets the baseline charge reading.
- Sweep slowly: move about 1–2 inches per second across the wall so the sensor can sample and average the signal.
- Mark edges, then center: when you see the edge signal, mark it; move across and find the opposite edge, then aim your fastener roughly midway.
Concrete tip: if your device gives noisy readings on a 1/2″ drywall, try calibrating over a 6″ section of plain drywall (no outlets) and sweep at 1 inch per second—this often cleans up false positives.
Early capacitor-based tools still had limits, like sensitivity to moisture or metal behind the wall, but Franklin’s patent is why the basic method became reliable enough for everyday use.
1980s Electronics: The First Commercial Stud Finder
If you’ve ever picked up a magnetic stud finder and wondered why this one felt different, this explains it.
Why it matters: the electronic model made finding stud centers faster and reduced guesswork. I remember holding one of the first commercial electronic stud finders from 1980; it used a capacitive sensor to detect tiny changes in wall density instead of relying on metal fasteners. For example, in my garage I could sweep the device across a drywall surface and see the indicator light up precisely where a stud’s center was, rather than guessing from nail locations.
How it works, step by step:
- Calibrate the unit on a blank area of wall — press and hold the calibration button for 2–3 seconds until the light blinks.
- Move the finder slowly, about 1–2 inches per second, keeping it flat against the wall.
- When the sensor detects the drywall-to-wood change, note the center mark or beep; mark the stud location with a pencil.
A practical tip: test on a known stud first. For example, stand by an outlet and sweep vertically above it; the electronic finder should show the stud under the outlet box, confirming your technique.
Retail adoption came quickly because pros and DIYers liked the cleaner results, and stores began stocking electronic models next to magnets. When you shop, check for clear instructions, simple indicators (LED plus beep), and presence of patent numbers printed in the manual or on the device so you can verify the design.
Why Early Electronic Stud Finders Often Failed
If you’ve ever tried an electronic stud finder and gotten nonsense readings, this explains why.
Why it matters: if you trust the reader on the wall, you’ll drill into the wrong spot and possibly hit wiring or miss the stud.
Early electronic stud finders were overly sensitive to tiny surface and material differences, so they gave false positives. I once ran one across a bathroom wall with textured paint and it lit up like it had found studs every few inches because the capacitive sensor reacted to paint thickness and moisture changes, not just wood or metal. That test showed false edges over textured paint.
These units also reacted to nearby wiring and metal trim, which can make the lights flicker and point to the wrong place. For example, a cheap finder I used near a metal vent produced a steady blinking pattern that suggested a stud where there was only ductwork. Calibration drift made things worse: as the room temperature shifted or the battery voltage dropped, the device’s baseline moved and the readings wandered. I watched a unit that seemed spot-on when I turned it on, then read 2–3 inches off after ten minutes.
How to use one so you don’t get fooled (do this every time):
- Calibrate the finder on a clear patch of wall for at least 5 seconds before each sweep.
- Sweep slowly—move at about 1–2 inches per second—keeping the finder flat against the wall.
- Sweep the same area vertically and horizontally; mark where both passes agree.
- Confirm with a small magnet along that line (use a fridge magnet) or drill a 1/16″ pilot hole if you need absolute certainty.
Real-world example: I needed to hang a 30-pound shelf over drywall and used these steps; the magnet found a nail head 3/8″ off from the finder’s first indication, and the pilot hole confirmed the stud center before I drilled the final 3/8″ screw hole.
Practical tips that save time:
- Replace batteries when lights dim; weak batteries cause drift.
- Keep the finder at least 6–8 inches away from known wiring or metal trim when calibrating.
- If the surface is textured or wet, put a 6″ square of plain drywall or cardboard against the wall and calibrate on that.
Follow those steps and you’ll avoid most false readings.
Instant and Multi-Sensor Stud Finders: How They Work

Here’s what actually happens when you scan a wall with a modern stud finder: it gives you more reliable results so you don’t have to guess where to drill.
Why this matters: missing a stud can ruin drywall, waste screws, or leave a heavy object unsupported.
Instant models scan multiple points across their face at once instead of relying on one sensor. For example, put an instant unit flat against a textured plaster wall and sweep across once; the device compares readings from dozens of tiny sensors and shows the stud edge immediately. This lets you mark stud edges without sliding the tool back and forth or hunting for a single spike.
If you’ve ever wrestled with a single-sensor finder, this explains the improvement: multi-sensor units combine different sensor types to give clearer wall maps. For instance, hold a multi-sensor finder over a bedroom wall and it will overlay edges and centers, estimate depth, and show stud width by fusing capacitive data with other signal types. That combination makes the tool filter out likely false positives from nearby pipes or live wiring, so you’ll see fewer phantom studs.
How to use these tools in three concrete steps:
- Calibrate the unit per the manual on a blank patch of drywall for 1–2 seconds.
- Place the finder flat, sweep horizontally at about 1–2 inches per second, and mark the first edge you see.
- Move the finder 1.5–2 inches inward to locate the center and verify by rescanning.
Real example: when hanging a 40-pound mirror, I used a multi-sensor finder, marked two stud centers 16 inches apart, and hit both centers on the first try—no extra patching, no second guessing.
When signals conflict, the device rejects readings that don’t match the expected pattern for wood studs (parallel edges ~1.5 inches apart, consistent depth). If it detects a narrow, isolated spike it flags that as likely piping or wiring. That means you get clearer placement and a depth estimate so you can pick the right screw length—usually 1 to 1.5 inches for most drywall-plus-stud jobs.
Real example: on a kitchen wall with plumbing, the finder showed a thin signal at 3/4 inch depth that didn’t line up with other sensors; I avoided drilling there and mounted the shelf two inches over, preventing a leak.
Quick tips:
- If your wall is double-layered or lath-and-plaster, pick a deeper-sensing mode and expect ±1/4 inch variance.
- For textured surfaces, use the instant-scan mode and press evenly; uneven pressure shifts readings.
- Always verify by tapping the stud center with a small nail before committing to large fasteners.
You’ll spend less time guessing and more time mounting things correctly on the first try.
Modern Smart Features in Stud Finders: Radar, FILTERz, Haptics
If you’ve ever held a cheap stud finder and still missed a pipe, this is why.
Why it matters: you can avoid drilling into wires or redoing drywall by finding studs and hidden objects reliably. Modern stud finders add three smart features that change how you work.
1) How does radar-based sensing find studs behind layers?
Why it matters: radar sees through paint, thin paneling, and shallow insulation so you don’t have to scrape or probe the wall.
Steps:
- You sweep the device across the wall at a steady pace of about 6–8 inches per second.
- The ultra-wideband radar sends pulses into the wall and times reflections to map density changes.
- The tool displays a marker when it detects a denser area consistent with a stud, typically within ±3/8 inch accuracy.
Example: when installing a 48-inch floating shelf on 3/8-inch plywood over drywall, sweep once across the marked height and watch for the radar marker to appear where the joist lines up with the shelf bracket.
2) What do FILTERz and radar filters actually do?
Why it matters: filters cut false alarms from wiring, metal pipes, and textured surfaces so you don’t second-guess every beep.
How it works:
- The algorithm analyzes the returned signal pattern and compares it to known signatures for wood, metal, and wiring.
- It reduces noise by suppressing repeatable non-stud echoes and highlights consistent linear targets.
- The finder then shows clearer targets or a confidence score on the screen.
Example: on a kitchen wall with conduit and a textured plaster finish, the filter reduces spurious blips so the display points to the stud behind the outlet box instead of the nearby pipe.
3) Why use haptic feedback instead of staring at the screen?
Why it matters: vibration lets you keep your eyes on mounting marks and the tool on the wall, reducing errors and improving safety.
How to use it:
- Turn on haptics in the settings before you start.
- Hold the tool flush, sweep at 6–8 inches per second, and feel for vibration pulses that indicate a stud or live wire.
- Mark the location immediately with a pencil when you feel a vibration.
Example: while hanging a mirror with two hooks, you feel a short pulse at the left hook location and a stronger sustained pulse at the right — mark both and mount the hardware into the stronger spot for maximum support.
Put together, radar sensing, FILTERz-style algorithms, and haptic alerts let you find studs faster and with more confidence, especially when you’re dealing with layered walls, hidden utilities, or working on a ladder.
Detection Limits: Depth, Wiring, and Pipe Capabilities
Before you pick a stud finder, you need to know what its limits are and why that matters: using the wrong tool can make you miss a pipe or hit a live wire.
Depth limits: why this matters — because if the sensor can’t reach the target, you won’t find it.
Basic capacitive models typically sense only about 2–6 millimeters into drywall; DeepScan or radar modes extend that to 20–70 millimeters depending on the unit. For example, if you’re hanging a heavy mirror on a wall with 1/2-inch drywall over a wooden stud, a basic capacitive unit may only detect the stud edge, while a DeepScan mode at 40 mm will find the stud center. To check your tool:
- Place a metal washer behind a scrap of drywall at known depths (10 mm, 30 mm, 50 mm).
- Run the finder over each spot and record which depths register.
- Mark the maximum depth you can rely on for future work.
Wiring detection: why this matters — because hitting a live conductor can be dangerous and costly.
Most stud finders detect live wiring by sensing electric fields from unshielded wires; they’ll reliably flag single live conductors within about 10–30 millimeters of the surface. Shielded cables, bundled wires, or conduit can hide the field and won’t trigger the sensor, and a live circuit that’s off won’t register at all. Visual example: when installing a light switch on a shared wall, a finder that detects live fields alerted me to a concealed cable 20 mm under the plaster, preventing a risky cut. To test wiring detection:
- Use a known live extension cord taped behind drywall at 10–20 mm.
- Scan with the finder and note whether it signals consistently.
- Repeat with the cord inside metal conduit to confirm the finder’s limitations.
Pipe detection: why this matters — because water or gas pipes are often smaller and made of different materials that change detectability.
Metal pipes are easier to find than plastic ones; a magnetic or metal-sensing mode will spot copper or steel within 20–50 mm, while plastic pipes are only detectable if they contain water and the unit has a specific moisture/radar setting that reaches 30–70 mm. Distance weakens signals, so a pipe 60 mm deep may show a faint or intermittent reading. Real example: I located a copper supply line 35 mm behind tile using a metal-sensor mode, but the adjacent PVC drain two inches back remained invisible until I used a radar setting. To confirm pipe detection:
- Run a water-filled plastic pipe at a set depth behind a test panel.
- Scan with metal, electric-field, and radar modes.
- Note which mode detects which pipe and at what depth.
Final practical tips: why this matters — because real projects need reliable, repeatable results.
- Read the spec sheet for stated detection depths and detection materials, and treat those numbers as a starting point.
- Do real-world tests on scrap material or behind an outlet before you trust the finder on a big job.
- If you must be certain about hidden utilities, hire a professional scan with ground-penetrating radar or open a small inspection hole.
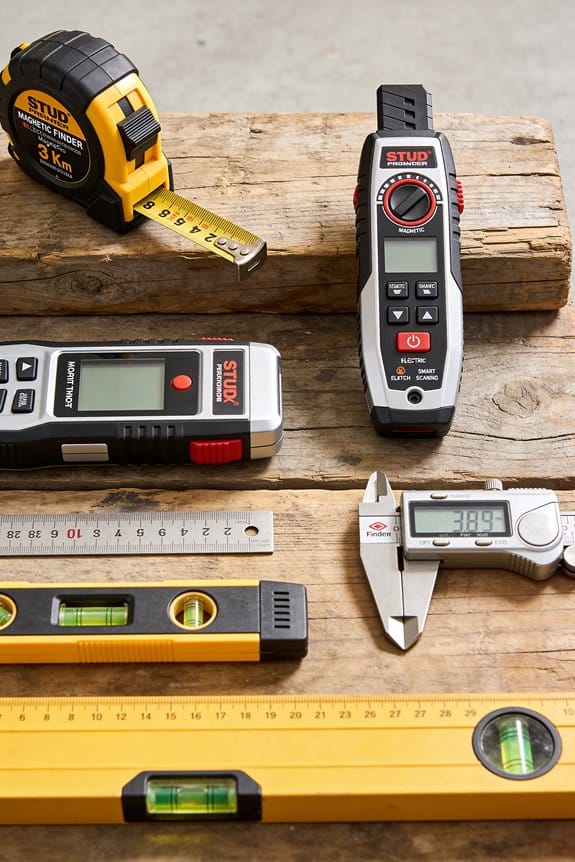
Comparing Technologies: Magnetic vs Capacitive vs Radar
If you’ve ever wondered which stud finder to use, this will save you time and mistakes.
Why this matters: choosing the wrong tool wastes money and can leave you drilling into pipes or empty space. When you need to hang a 50-lb shelf or mount a TV, pick the right sensor.
Magnetic stud finders — what they do and when to use them
Why this matters: magnetic units locate the metal fasteners that hold studs, so they point you to where nails or screws are.
Magnetic finders sense metal only.
Example: when you’re rehanging a picture frame on an older plaster wall with visible nail heads, a magnetic finder tells you exactly which nails are behind the paint.
How to use one:
- Sweep the tool slowly across the wall until the magnet sticks or an indicator aligns.
- Mark the spot with a pencil.
- Scan vertically to find the nail row and infer the stud edge.
Magnetic finders are cheap (about $5–$25) and require no batteries, but they won’t locate a stud if there are no metal fasteners or if the screws are recessed far from the surface.
Capacitive stud finders — what they do and when to use them
Why this matters: capacitive devices detect changes in wall density, so they can find stud edges and centers without relying on metal.
Example: when installing kitchen cabinets on drywall, a capacitive scanner helps you map the stud centers behind a textured paint finish.
How to use one:
- Calibrate the device on a known empty patch of wall (hold it flat and press the calibration button).
- Move the unit horizontally at a steady speed; mark where the indicator changes for edges and centers.
- Verify by scanning above and below the first pass to confirm the stud line.
Capacitive units cost about $20–$80 and are better at mapping wood studs, but they can be fooled by wallpaper, moisture, or thick plaster, and they need recalibration when you change wall surface or orientation.
Radar-based scanners — what they do and when to use them
Why this matters: radar scanners send radio waves through materials, so they can image deeper cavities and reveal pipes, wires, and joists.
Example: when you’re cutting a large opening for a passthrough or chasing plumbing behind an exterior wall, a radar scanner can show voids, a metal pipe at 3–4 inches depth, and even insulation type.
How to use one:
- Power on and set the scan depth (typically 2″, 4″, or 6″+ depending on the model).
- Sweep slowly and watch the display for density changes and icons representing objects.
- Cross-scan the same area in perpendicular directions to triangulate object position.
Radar scanners are more expensive ($200–$1,500+), give deeper penetration, and can differentiate materials, but you’ll spend time learning the display and they require batteries or a charger.
Choosing between them — quick guide
Why this matters: matching tool to task saves time and prevents mistakes.
- For simple picture-hanging or finding nails: use a magnetic finder ($5–$25).
- For locating wood stud centers on drywall: use a capacitive finder ($20–$80).
- For deep scans, pipes, wiring, or unknown wall builds: use radar ($200+).
A final practical tip: when safety matters, confirm with two methods — for example, use a capacitive scan to find a stud, then a magnetic check to verify nail locations before drilling.
Quick Guide: Which Stud Finder for Common Projects?
Before you start, match the tool to the task so you don’t drill into pipes or miss a load-bearing stud.
Start with the basics: use a magnetic stud finder for quick, cheap checks on budget builds because it finds nails and screws indicating stud locations. Example: when hanging a 12″ floating shelf in a rental with thin drywall, run the magnet slowly across a 3‑foot span until it snaps to a screw — mark that spot. Steps: 1) Place finder flat against wall. 2) Slide slowly, about 1–2 inches per second. 3) Mark each metal hit. This model is simple and costs around $5–$15.
For typical DIY wall shelving or picture hanging, choose a capacitive electronic finder because it senses density shifts and locates stud edges and centers to moderate depth, which gives a firmer anchor than a magnet alone. Example: installing a 24″ wall cabinet on 1/2″ drywall, scan vertically to find two edges, then measure the center for a 1/4″ pilot hole. Steps: 1) Calibrate on blank drywall for 2–3 seconds. 2) Scan slowly horizontally. 3) Mark edges and measure center. Expect 3/4″–1″ detection depth; these units run about $15–$40.
If you work on renovations with thicker walls or plumbing, choose a multi-sensor or radar unit because it penetrates deeper and distinguishes metal, wood, and voids so you can avoid pipes and wiring. Example: when removing tile and mounting a vanity on a plaster wall over lathe, use a multi-sensor to confirm stud spacing at 16″ or 24″ and to spot a copper pipe behind the plaster. Steps: 1) Select wood/metal/AC mode. 2) Sweep twice at different angles. 3) Verify readings with a small inspection drill or detector. These cost $60–$300 but cut guesswork.
For one-off jobs, consider renting a high-end unit so you get advanced features without buying. Example: renting a rental-grade radar scanner for a weekend kitchen demo helped a homeowner locate not just studs but an unexpected metal beam. Steps: 1) Check local tool rental prices (often $20–$50/day). 2) Test on a known wall first. 3) Return when finished.
Match features to how often you use the tool and the complexity of your projects, and you’ll save time and avoid costly mistakes.
Common Mistakes and Tips for Reliable Detection
If you’ve ever rushed a DIY wall project, this is why.
Why it matters: false readings can make you drill into pipes or miss studs, wasting time and risking damage.
Example: I once watched a neighbor mark a stud over a shower wall and hit a copper pipe because they skimmed the area quickly.
1) How should you scan the wall for reliable readings?
Why it matters: slow, overlapping scans catch repeated signals and reduce false positives.
Steps:
- Start by marking a horizontal reference line 4–5 feet off the floor so you scan the same band across the wall.
- Calibrate the finder on a clear 6–8 inch patch—no trim or outlets.
- Move the tool at 1–2 inches per second, overlapping each pass by about 2 inches.
- Make at least three passes over the same spot; mark where the signal repeats.
Real-world example: while hanging a shelf, you make three overlapping passes and see the signal at 14 inches from the corner every time; that’s your stud location.
Tip: when I say calibrate, I mean place the tool flat, press the calibration button, and wait for the ready light—about 2–3 seconds.
2) Which mode should you use for different walls?
Why it matters: matching mode to wall thickness and material prevents missed studs or false hits.
Example: a 3/8-inch plaster wall over lath hides studs more than a single 1/2-inch drywall wall.
Steps:
- Use *edge* mode for typical 1/2-inch drywall and to find stud edges quickly.
- Use *center* mode when you want the stud’s middle; it’s best for mounting heavy items.
- Use *deep* mode for plaster, lath, or walls with paneling—expect slower scans.
If you’re unsure about thickness, measure at an outlet by removing the cover; that gives you a number to match to the mode.
3) How do you avoid metal, wires, and pipes being misread as studs?
Why it matters: metal and live wiring can trigger sensors and lead you to mark the wrong spot.
Example: on a bathroom wall, the finder lit up where copper pipe ran vertically behind the tile.
Steps:
- Scan vertically and horizontally; pipes and conduits often run straight up or along studs.
- Use a magnetic stud finder or a small fridge magnet to confirm a stud if the electronic unit is ambiguous.
- Keep an eye out for repeated thin signals—those often mean metal or wiring, not a wood stud.
If you get an intermittent thin-line signal, assume metal and probe elsewhere.
4) When and how often should you recalibrate and check batteries?
Why it matters: sensors drift and weak batteries change sensitivity, giving inconsistent results.
Example: I calibrated in a warm room, then moved to a cold garage and lost accuracy until I recalibrated.
Steps:
- Calibrate each time you change rooms or move more than 6 feet along the wall.
- Swap batteries at the first sign of dim lights or erratic beeps; alkaline batteries usually last months with occasional use.
- If temperature changes by more than 10°F, recalibrate before scanning.
5) How do you confirm a stud before drilling?
Why it matters: a final physical check prevents mistakes from electronic errors.
Example: before hanging a TV, I used a 1/8-inch pilot hole and found the stud center exactly where the finder indicated.
Steps:
- Use a magnetic probe along your marked line to find nails or screws—those confirm wood studs.
- Drill a 1/8-inch pilot hole where the finder shows the stud center; if you hit wood within 1/2 inch, you’re good.
- If the pilot hole hits metal or nothing, move sideways 1–2 inches and retest.
Final practical checklist
Why it matters: a short routine keeps your readings reliable every time.
Example: before I hang anything, I follow these five quick actions and avoid surprises.
Steps:
- Measure wall thickness at an outlet.
- Calibrate on a 6–8 inch clear patch.
- Scan slowly at 1–2 inches/sec with 2-inch overlaps and three passes.
- Verify with a magnet or pilot hole.
- Recalibrate after moving more than 6 feet or if temperature changes by ~10°F.
One bold tip: always verify electronically found studs with a physical check before you drill.
Frequently Asked Questions
Can Stud Finders Detect Studs Behind Metal Lath or Plaster Walls?
Yes — I can, but it’s tricky: metal lath and plaster backing can mask signals, so I use multi-sensor or radar-enabled finders, sweep slowly, and verify with multiple passes to reliably locate studs behind that obstruction.
How Do Temperature and Humidity Affect Stud Finder Accuracy?
Temperature drift and humidity interference can reduce accuracy; I’ll recalibrate often, avoid extreme heat or moisture, and use multi-sensor or deep modes to compensate, since sensors and electronics shift readings with thermal and moisture changes.
Are Smartphone Apps Reliable Substitutes for Dedicated Stud Finders?
No—stud finder apps aren’t full substitutes; I’ll note 21.9% CAGR signals growing device demand. App limitations and sensor comparison matter: apps lack depth/accuracy, so I’d choose dedicated sensors for reliable, professional results.
Do Studs Spaced Irregularly Require Special Detection Techniques?
Yes — I do recommend special techniques: with irregular spacing I use multi-sensor scanning, Advanced calibration modes, edge‑finding passes and DeepScan to confirm centers, plus manual probing to avoid false positives from wiring or plumbing.
What Maintenance Extends a Stud Finder’s Useful Lifespan?
Honestly, like it’s my lifeline, I treat maintenance seriously: clean storage in a dry case, wipe sensors gently, and follow strict battery care — remove batteries for long storage, use fresh cells, and check contacts regularly.