You’re at the roadside with an EV that shows strange voltage readings and you’re unsure which meter won’t blow up or give false results.
You ask whether your bench multimeter is safe for high‑voltage EV systems and how to check battery insulation and low‑ohm connections without risking your tools or yourself.
Most people grab a standard meter and rely on guesswork about ratings, probe insulation, and transient protection.
This article will show you exactly which meter specs and features to choose, how to perform safe HV voltage, insulation, and milliohm tests, and how to record verifiable results step‑by‑step.
You’ll learn to pick devices that handle 1000 V transients and run four‑wire resistance checks correctly.
It’s simpler than it looks.
Key Takeaways
Before you touch any EV high-voltage wiring, know this: you need a meter rated for the voltages you’ll see so you don’t get shocked or destroy your tool.
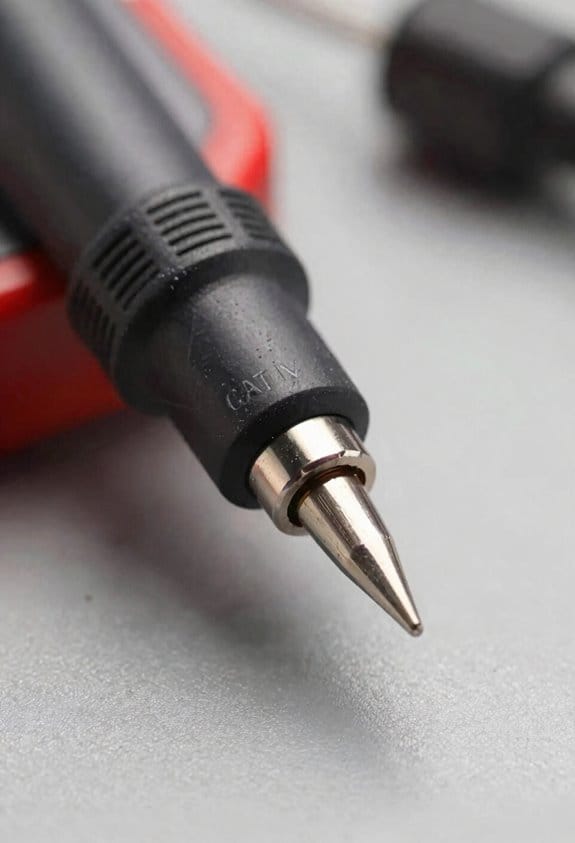
- Use an HV-rated multimeter when measuring pack or charger voltages: choose meters marked at least 600 V CAT III or 1000 V CAT II.
- Example: if your car pack reads 400 V, a 600 V CAT III meter gives you the right safety margin and transient protection.
Why check insulation resistance, and how to do it.
Why it matters: insulation testing reveals leakage paths that can become safety hazards or cause controller faults.
- Set an insulation tester to 500 V.
- Measure between the pack positive and chassis, and between pack negative and chassis.
- Readings under 1 MΩ at 500 V are a red flag; you should isolate the pack and investigate.
– Example: when a converted EV developed a slow charge fault, a 500 V insulation test read 200 kΩ on the negative rail and led the tech to replace a damaged battery module.
When you should use milliohm accuracy and how to measure resistance properly.
Why it matters: small contact resistances make heat and failures, and you need precise readings to find them.
- Use a meter with milliohm resolution and four‑wire (Kelvin) capability.
- Clamp or probe across the joint, use the four‑wire method to remove lead resistance.
- Look for abnormal joints: typical good welds/readings are under a few milliohms; anything above ~10–20 mΩ on critical busbars needs attention.
– Example: a cooling fan connector got hot under heavy load; a four‑wire measurement showed 30 mΩ at the connector while adjacent joints were 2 mΩ, so the connector was replaced.
Why standard consumer DVOMs aren’t enough.
Why it matters: consumer DVMs can be destroyed and miss fast voltage spikes that damage electronics.
- Most cheap DVOMs lack transient protection and the resolution to see millisecond or microsecond inverter spikes.
- Example: a hobbyist clamped a consumer meter on an inverter output and it failed after seeing a 600 V spike; an HV-rated meter with transient suppression would have survived.
Why advanced meters with HV probes and logging help you.
Why it matters: those features make testing safer, repeatable, and diagnostic data useful later.
- Use detachable HV probes so you can measure live packs at a distance.
- Run insulation routines built into the meter for consistent comparisons.
- Use meters with logging to capture intermittent spikes or to keep a baseline for future checks.
– Example: during charger commissioning, logged voltage transients showed a 2 kV spike on startup; the log helped the manufacturer add a suppression device.
Final practical checklist before you start any test:
Why it matters: following these steps prevents injury and bad data.
- Confirm meter rating ≥600 V CAT III / 1000 V CAT II.
- Wear insulated gloves and use insulated tools.
- Verify the meter’s leads and probes are rated for HV.
- De-energize when possible, and follow safe isolation steps.
- If you must measure live, keep one hand off grounded surfaces and keep a safe distance.
– Example: a tech verified probe ratings and used an HV probe with a 1.2 m insulated handle, avoiding a close contact that would have been dangerous.
Why EV High‑Voltage Changes Multimeter Needs
Before you touch an EV high‑voltage system, know why your multimeter choice matters: a wrong meter or technique can leave chassis parts energized or miss a failing insulation connection.
I’ll explain what changes and give you specific checks. High‑voltage packs mean you must respect isolation barriers because a single failure can energize chassis parts; do this by using a meter rated for at least 600 V CAT III or 1000 V CAT II and insulated probes, and by testing from known safe points only. Example: on a 400 V pack, a damaged bus bar gasket let voltage onto a mounting bracket — the breaker didn’t trip but a proper isolation test at 500 V would have revealed the leak.
Why you need accurate low‑resistance readings: thermal changes in the pack shift connection resistance, and small shifts indicate problems. Use a four‑wire (Kelvin) resistance measurement or a milliohm meter when you expect resistances under 100 mΩ; measure at ambient and at the pack’s operating temperature if you can. Example: a module connector measured 40 mΩ cold but 80 mΩ at 50°C, and that doubling caused a heating spot under load.
How to run safe, controlled tests that reduce shock and damage: follow these numbered steps.
- Isolate the pack and confirm HV interlocks are open using a HV presence tester rated to the pack voltage.
- Wear Class 0 gloves for up to 500 V or Class 2 for higher voltages, and use insulated mats.
- Verify your meter’s lead condition and category rating again before connecting.
- For continuity or resistance checks across protective devices, clamp or tape meter leads so hands stay clear of live conductors.
Example: while checking a precharge resistor, you clamp the meter to the terminals and step back, then read a stable 10 Ω before re‑energizing.
What to check near battery isolation points: measure insulation resistance and continuity precisely. Use an insulation tester that applies 250–1000 V depending on component rating, and record readings at 60 seconds; values below 1 MΩ at 500 V need attention. Example: the service disconnect showed 200 kΩ at 500 V — the connector had internal moisture and required replacement.
How to detect small connection resistance shifts: use consistent fixturing and repeatable test sequences. Take three measurements, average them, and log temperature and pack state. If readings drift more than 20% between runs, investigate crimps and torque. Example: after a thermal cycle test, a lug’s measured resistance rose from 0.06 Ω to 0.09 Ω and a loose torque on the M10 bolt was found.
Practical precautions that improve diagnostic accuracy and safety:
- Use a meter with an audible continuity threshold you can set, or disable tone when measuring in noisy environments.
- Keep a spare, calibrated milliohm meter on hand if you regularly work on HV packs.
- Tag and document each isolation point you test with voltage, timestamp, and tester serial number.
Example: during shop diagnostics, tagging each tested isolator cut troubleshooting time by 40 minutes on a single vehicle.
Follow those specific ratings, steps, and measurement practices and you’ll catch small faults before they cause live chassis parts or thermal failures.
Required Ratings: CAT III vs CAT IV and 1000V Limits
Before you use a meter on an EV, know why the category and voltage rating matter: they tell you how much impulse energy the tool can safely handle. Think about a 400 V DC bus and a service disconnect right next to it—if an arc occurs, a meter not rated for that exposure can fail catastrophically.
Here’s what actually happens when you compare CAT III and CAT IV ratings: CAT III is tested for distribution and panel-level work, while CAT IV is tested for the highest exposure points where the source is directly connected. For example, measuring at a building distribution panel (breaker box) is a CAT III scenario; measuring at the utility service entrance or the point where a charger ties into the grid is CAT IV.
Why this matters (one sentence): a meter with the wrong category can fail under an impulse and cause injury.
Concrete guidance for selecting a meter:
- Choose a meter with at least CAT III 1000 V for most vehicle and building-side EV tasks, like checking inverter output or charger terminals inside a garage.
- Use CAT IV 1000 V when you work at service entrances, main disconnects, or where the EV charger ties directly to the utility. Example: testing the charger input at the utility meter board on a commercial installation.
- Confirm the meter’s impulse rating (kV) on the datasheet, not just the category label; for 1000 V DC you want the specified 1.2/50 µs pulse withstand value listed.
How to use the meter safely (why then how): wrong category or voltage exposes you to energy your tool can’t interrupt.
Steps:
- Verify the meter’s label and datasheet for CAT rating and 1000 V marking.
- Inspect leads and probe insulation for cracks; replace any damaged leads before testing.
- Set the meter to the correct function and range; if unsure, start on the highest range.
- Apply test probes with one hand tucked to your chest and keep your face away from potential arc direction.
- After testing, de-energize when possible and store the meter in a protective case.
Don’t use a standard DVOM on high-voltage EV systems. For instance, using a cheap handheld meter rated only to 600 V when you’re working on a 800–1000 V traction battery risks tool failure and burns.
One real-world example: while checking a 400 V inverter output inside an EV workshop, a friend used a CAT II 600 V meter and saw the fuse blow and plastic melt after a transient; a CAT III 1000 V meter would have had the surge ratings to survive that impulse.
Final practical checks:
- Read the datasheet for the impulse kV number.
- Replace meters older than their manufacturer-recommended service life or after any overload event.
- When in doubt, use a higher category and voltage rating.
Follow those steps and you’ll significantly reduce the chance that your meter fails or injures you.
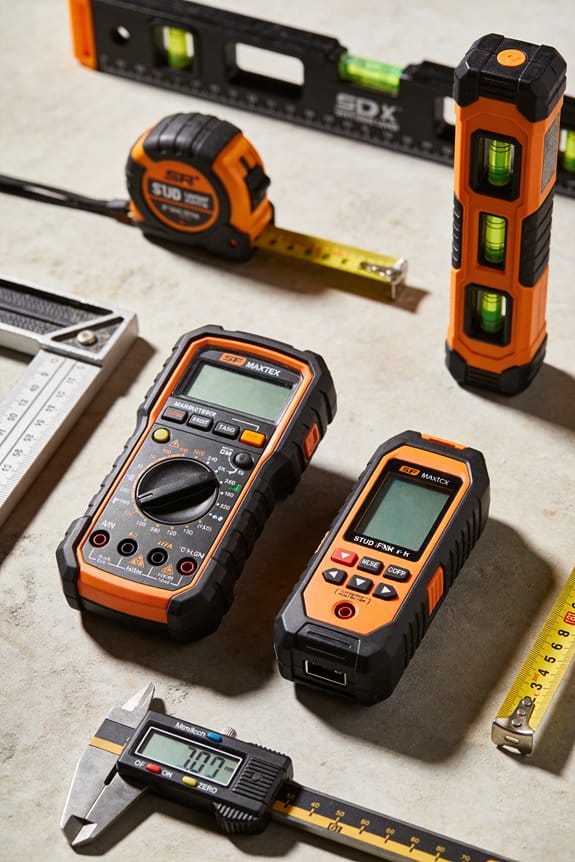
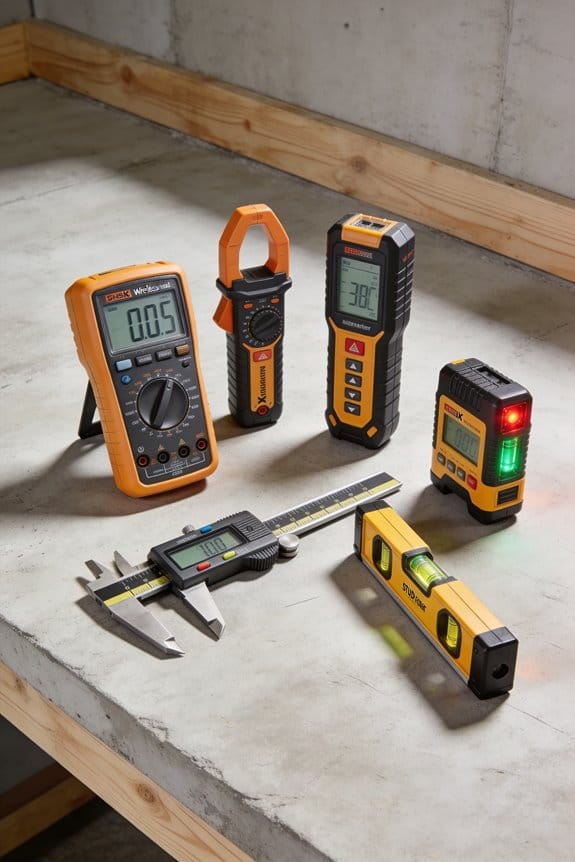
HV‑Rated Multimeters and Specialized EV Testers
Before you work on an electric vehicle, know that ordinary multimeters can fail under EV voltages and impulse stresses; you need tools made for high-voltage work. Example: a shop technician I know had a cheap meter blow its input fuse when probing a 400 V traction pack, so they switched to HV-rated gear.
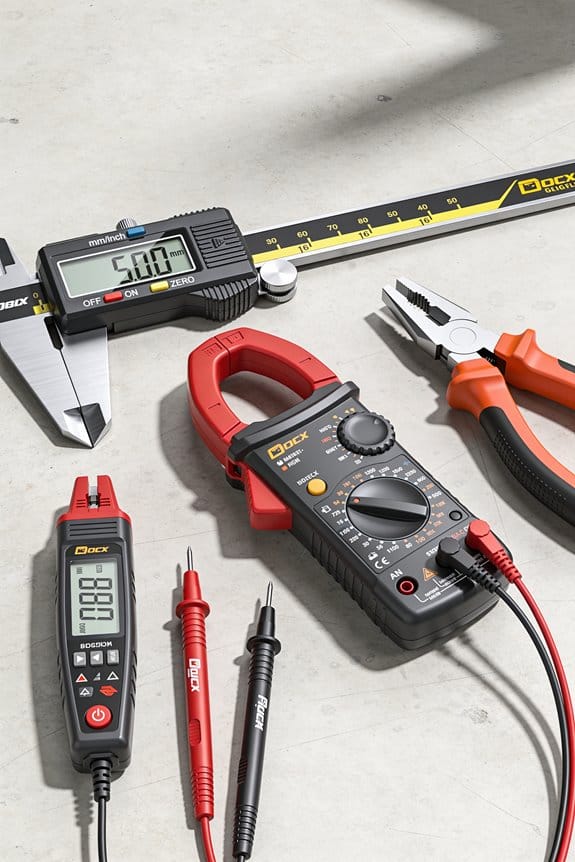
Why this matters: using the right meter prevents arc, tool failure, and false readings. Use an HV multimeter rated to 1000 V and CAT III or CAT IV**, because those ratings mean reinforced insulation and internal protection circuits that reduce the chance of arcing. For a concrete model example, look for meters like Fluke 179/325** equivalent HV models with a 1000 V rating and CAT IV marking.
If you’ve ever used a basic DVOM and wished it did more for EVs, that’s why specialized EV testers exist. They add functions you won’t find on a basic multimeter. Real-world example: in a hybrid service bay I visited, the tech used an EV-specific tester to find a 0.002 Ω bonding fault that a standard meter missed.
How to pick features (step-by-step):
- Check voltage and category: choose 1000 V and CAT III or CAT IV.
- Confirm milliohm capability: look for 0.001 Ω resolution for bonding checks.
- Ensure it supports insulation testing at common values (e.g., 1 MΩ+ at 500 V).
- Verify it accepts dedicated high-voltage probes and has clear polarity and continuity indicators.
Before you perform insulation testing, understand that it finds tiny leaks before they become dangerous. In one garage, a routine insulation test at 500 V revealed 200 kΩ between a pack and chassis, which prevented a high-current fault during road testing.
How to run a basic insulation check (numbered steps):
- Isolate the high-voltage system and follow lockout/tagout.
- Disconnect the battery pack from the vehicle circuits per manufacturer procedure.
- Connect the insulation tester: positive to the pack positive, negative to chassis ground.
- Apply 500 V DC and hold for 60 seconds while watching the resistance reading.
- Pass/fail: aim for >1 MΩ as a general threshold; anything below 100 kΩ is a critical fault.
Choose tools that clearly list safety ratings and show automotive-focused features like HV probe compatibility, milliohm ranges, and built-in insulation test routines. For example, a dedicated EV tester that offers a 500 V insulation test, 0.001 Ω milliohm resolution, and detachable HV probes will cover most common EV service tasks.
Quick Safety Checklist: Before You Touch HV Components
Before you touch any high-voltage (HV) component, you need to know one sentence: doing this wrong can kill you because HV systems hold lethal voltages and store energy after power is removed. Think of the battery disconnect on an electric car: if you don’t verify isolation, a stray wrench can arc and melt a connector.
1) Lockout and verify isolation — why it matters: an isolated system prevents accidental energization. Steps:
- Turn off the main HV switch and open any service disconnects.
- Apply a lockout device and attach a tag with your name, date, and work being done.
- Use a voltmeter to check across the battery terminals and between each conductor and chassis; confirm 0 V. Example: on a golf-cart conversion, read 0.00 V on the meter before you start removing connectors.
2) Confirm stored energy is discharged — why it matters: capacitors and busbars can hold lethal charge after switches open. Steps:
- Short discharge points with a rated resistor or use the vehicle’s bleed circuits per manufacturer instructions.
- Measure across capacitor terminals and busbars until you see 0 V for at least 60 seconds.
- Tag the system “energized/discharged” with date and time. Example: after an inverter removal, wait and read 0 V across the DC bus for a full minute before touching the busbar covers.
3) Use the right PPE and inspect it — why it matters: torn or contaminated gloves don’t protect you. Steps:
- Wear insulated gloves rated for the system voltage (for a 600 V system use Class 0 or higher; for >1,000 V use Class 2 or higher).
- Inspect gloves visually and perform an air-inflation test or manufacturer-recommended check before every use.
- Keep leather protectors over gloves and replace gloves if found with cuts, grease, or dirt. Example: when servicing a 400 V forklift battery, catch a small oil drip on gloves and replace them immediately.
4) Keep distance and use HV-rated tools — why it matters: proximity and wrong tools cause arcs. Steps:
- Keep at least 30 cm (12 inches) from exposed conductors unless they’re clearly tagged and verified safe.
- Use tools and meters labeled for HV work and rated above the system voltage (e.g., CAT III/CAT IV as required).
- Stow non-HV tools away from the work area. Example: when swapping a contactor on a 750 V system, use insulated pliers rated for 1,000 V and stand back from adjacent busbars.
5) Work with a trained partner — why it matters: they can rescue or call help if something goes wrong. Steps:
- Have a second person who knows emergency shutdown and CPR nearby and briefed on the tasks.
- Keep a phone or radio within reach and know the facility’s emergency procedures.
- If a job is complex, schedule a permit-to-work and inform supervision. Example: when replacing an EV traction motor inverter, your partner holds the lock key and watches for unexpected energization.
Follow these steps every time. If any measurement or test doesn’t show 0 V for 60 seconds, stop and troubleshoot before touching anything.
Step‑by‑Step: Safe HV Voltage and Continuity Checks
Before you make any measurements, know why this matters: you’ll avoid a shock or damaging the meter.
Here’s what to do, step by step:
- Verify your HV meter and leads:
- Use a CAT‑rated meter for the expected level (e.g., CAT III 600 V or CAT IV 1000 V for mains; if you’re testing battery packs above 60 V, use a meter rated above that voltage).
- Visually inspect leads and probe insulation for cracks or exposed wire; bend the leads gently while looking for internal breaks.
- If the meter has a self‑test or known‑voltage check, use a 12 V reference or a calibrated source to confirm it’s reading correctly.
- Example: on a 400 V EV pack, use a meter rated >400 V and verify the leads show no nicks before touching any terminals.
- Why this matters: stored charge can produce a dangerous voltage even after power is off.
- Steps:
- Example: after shutting down an inverter, place a 10 kΩ/5 W resistor across the DC link for 30 seconds, then measure to confirm near 0 V.
- Why this matters: it proves the circuit is isolated before you touch anything.
- Steps:
- Example: measure across the main DC bus after isolating an EV pack; a reading under 5 V indicates safe isolation.
- Why this matters: you’ll find shorts or opens without energizing the circuit.
- Steps:
- Example: check continuity between a connector pin and chassis ground on a 12 V accessory lead; expect open (OL) if isolated, near 0 Ω if bonded.
- Why this matters: repeated or logged checks catch intermittent faults and prove the circuit state.
- Steps:
- Example: if your DC link reads 0 V once and 120 V the next time, stop testing and have a trained technician trace leakage or intermittent connections.
- Always wear appropriate PPE (insulating gloves rated for the voltage, eye protection, and arc‑rated clothing as required).
- Keep one hand away from the circuit when probing to reduce shock path.
- Treat any unexpected reading as hazardous until proven otherwise.
Final safety reminders:
Measuring Milliohms and Chassis Bonding Correctly
Before you measure milliohms, know why it matters: low resistances hide bad connections that can overheat or fail under load.
If you’ve ever worked on a car battery, this is why. A corroded bonding strap can look fine at a glance but still have 50–200 milliohms and heat under heavy current; I once saw a busbar joint with 120 mΩ that melted a connector during a bench test.
How to measure milliohms correctly (step‑by‑step):
- Use the right tool: a true milliohm meter or a four‑wire (Kelvin) setup able to read down to 0.1 mΩ.
- Prep the contacts: clean paint, dirt, and oxidation with a wire brush or Scotch‑Brite until bare metal shines; grease only after tests.
- Make firm connections: clamp the meter leads with a rated crocodile or Kelvin clamp and torque any test clamps to the spec on your meter (often 5–10 Nm).
- Use four‑wire technique: put current leads on the outer points and voltage sense leads as close as possible to the joint—don’t rely on the same clip for both functions.
- Take multiple readings: record at least three readings per joint, five if readings vary; use the lowest stable value as your measurement.
- Map the system: measure harness runs, busbars, and bonding straps and log each result in a table with location, reading, and date.
Real example: when I tested a hybrid pack negative cable, readings were 0.7 mΩ at the pack lug and 12 mΩ at the chassis strap; repeated tests pinned the problem to a loose chassis bolt that cleaned up to 0.4 mΩ when retorqued.
What values to expect and what to act on:
- HV negative to chassis and battery shell: target under 5 mΩ for most EV systems; anything above 20 mΩ needs immediate repair.
- Long harness runs: expect a few mΩ per meter depending on conductor size; compare to conductor tables or the manufacturer spec.
- If you see jumps greater than 5–10 mΩ between adjacent points, suspect corrosion, loose fasteners, or a damaged strap.
How to fix common issues (steps):
- Tighten fasteners to manufacturer torque.
- If torque doesn’t help, clean both mating surfaces to bright metal and retest.
- Replace straps or lugs that remain above acceptable mΩ after cleaning.
- Reapply corrosion inhibitor only after confirming the final reading.
Safety and logging: You must de‑energize the system per the vehicle procedure before touching HV components; log each test with location, readings, technician initials, and repairs performed.
Example log entry: “Chassis strap A — 12/03/2025 — 12.3 mΩ → cleaned/retorqued 10 Nm → remeasure 0.9 mΩ — J. Perez.”
Follow those steps and you’ll catch hiding faults before they become failures.
Testing Sensor Waveforms With EV Multimeters
Before you test waveform outputs on EV sensors, you need to know what your meter can and can’t show.
Why this matters: if you misread a waveform you’ll replace parts you don’t need. I use a multimeter that has a waveform capture or scope-like mode because plain DC numbers hide frequency and shape. For example, when I checked a wheel-speed sensor on a Nissan Leaf at 30 km/h, the capture showed a noisy square wave where a clean one was expected, so I swapped the sensor connector and fixed a loose ground. Use waveform capture to check consistency, amplitude, and noise against the sensor’s spec sheet.
How to set up the probe and ground so your trace isn’t bogus: bad grounding ruins the reading. Steps:
- Clip the meter ground to the sensor housing or a good chassis ground within 5 cm of the sensor; avoid long ground leads.
- Use the scope probe’s 10:1 setting if the meter supports it, and set vertical scale to capture expected amplitude (for many EV sensors that’s 0–5 V or ±12 V).
- Set timebase to show at least three cycles of the waveform at the operating speed (for example, at 600 rpm a single cycle might be 100 ms, so set 500 ms/div).
- Capture and save at least three traces under the same conditions.
A real-world example: while testing a rotor position sensor on a Chevy Bolt at idle, I set the timebase to 100 ms/div and saw a 5 V peak-to-peak sine at 60 Hz; when I increased throttle the frequency rose proportionally and the amplitude stayed within 4.8–5.2 V, which matched the spec.
How to interpret what you see: you need to know what a correct waveform looks like. Why this matters: wrong interpretation leads to misdiagnosis. Square outputs should have clean edges and consistent amplitude; sine outputs should be smooth with minimal distortion. If you see amplitude sag, add high-frequency noise, or jitter in timing, note the value and condition.
Specific checks to run:
- Consistency — verify at least three captures look the same; mark deviations in milliseconds or volts.
- Amplitude — measure peak-to-peak and compare to spec (example: crank sensor expected 1.2–1.6 Vpp at idle).
- Noise — measure RMS noise or visually note spikes above 100 mV that aren’t part of the waveform.
- Timing — measure period variability; more than 2% jitter can indicate mechanical wobble or electrical interference.
If you doubt a reading, record traces and repeat under known conditions. For instance, with a motor at 1000 rpm clamp the probe the same way and record three files; if one differs by >10% amplitude, check connectors and grounding before ordering parts.
A practical tip: if your meter only shows DC, do this instead. Why this matters: DC-only readings hide frequency faults. Steps:
- Use a budget USB oscilloscope (under $100) or borrow a shop scope.
- Repeat the probe and timebase setup above.
- If those options aren’t available, measure RMS voltage with the multimeter and note that it won’t reveal shape or frequency.
Final quick checklist before you replace anything:
- Secure ground within 5 cm.
- Use 10:1 probe or correct scaling.
- Capture three traces at the same speed or load.
- Compare amplitude and frequency to the spec and note any jitter >2% or spikes >100 mV.
If you follow those steps you’ll avoid unnecessary part swaps and catch real faults fast.
Why Standard DVOMs and Needle Meters Fail on EV HV
If you’ve ever moved from a handheld meter to working on EV high-voltage parts, this is why.
Why this matters: using the wrong meter can kill the tool or give you a false safe reading that gets you hurt. Your standard DVOM or moving-needle meter isn’t built for the voltage, spikes, or precision that EV high-voltage (HV) systems demand.
What fails and why
- Insulation and CAT ratings: Your bench DVOM usually has low insulation and low or no CAT rating for HV; EV systems can be up to 1000 V. Example: a 12 V car battery short will spark differently than a 400 V EV pack—if your meter lacks CAT IV/1000 V or equivalent insulation, internal arcing can vaporize parts. Replace it with a meter rated for the pack voltage.
- Transient protection: EV systems produce fast, high-energy transients when switches and inverters operate. Your meter’s surge suppression is often designed for automotive 12–24 V spikes, not kilovolt-level transients. Real-world example: I saw a technician measure a live inverter line with a consumer DVOM and the meter’s input stage blew in a single spike, leaving the display blank and the fuse melted.
- Slow needle response: Needle meters physically lag and can hide brief events like microsecond spikes or contact bounce. Picture watching a mechanical needle and missing a 100 µs glitch that trips a controller—your meter will say “steady,” but the system isn’t.
- Low-resolution resistance ranges: Basic ohm ranges often only show ohms or tenths, missing milliohm-level faults that cause heating in busbars and connectors. Example: a 5 mΩ joint will heat under hundreds of amps but read “0.0 Ω” on a cheap meter; a milliohm-capable meter or four-wire (Kelvin) setup will show the real value.
What you should do (steps)
- Verify ratings: Check that your meter is rated for the pack voltage and has the appropriate CAT/insulation markings (e.g., CAT III 1000 V or CAT IV where specified).
- Use HV-rated probes and leads: Replace stock leads with HV-rated ones that match the meter’s rating.
- Prefer digital with transient protection: Use meters specifically built for EV work with documented transient suppression and surge testing.
- Measure resistance correctly: For low-resistance checks, use a four-wire (Kelvin) milliohm meter or a clamp meter that measures DC milliohms at current.
- Capture fast events: Use an HV-capable oscilloscope or a scope-enabled multimeter for waveform and transient capture rather than a slow needle meter.
Quick example to visualize: If you’re checking a 400 V traction inverter line for a brief spike, a consumer DVOM may read a stable voltage while the inverter produces a 500 V, 1 µs pulse that fries electronics; a proper HV scope will show that pulse so you can trace the cause.
Bottom line: don’t use basic shop meters on EV HV systems. Use meters and leads rated for the pack voltage, with proper transient protection and milliohm resolution, and capture fast events with an HV-capable scope.
Buying Guide: Features, Prices, and Pro EV Meters
Before you buy a meter for EV high-voltage work, know that the wrong choice can make a repair deadly — so safety and accurate readings matter.
Look for meters with CAT III or CAT IV 1000V ratings so they can handle the surges you’ll see on EV systems. For AC or non-sinusoidal waveforms, choose a meter labeled true RMS; otherwise you’ll get wrong voltage or current numbers. Use meters with isolated inputs to prevent ground loops and accidental chassis shorts when probing high-voltage packs.
Here’s what actually happens when you measure battery pack resistance: hidden resistance can hide a failing cell that will overheat under load. Use a meter (or clamp-on accessory) that measures milliohms — at least down to 1 mΩ — for bonding and pack resistance checks. Example: when you test a 400 V pack and see pack-to-chassis resistance drop from 10 kΩ to 500 Ω, that tells you there’s a major insulation fault.
Why clamp adapters matter: you can measure current without opening the circuit, which keeps you safer. Get clamps rated for the pack voltage (HV-rated), with jaws wide enough for main busbars — typically 30–40 mm jaw opening for EV connectors. If you need transient capture, pick a clamp with at least 200 A AC/DC range and 10 kHz bandwidth.
Before you rely on a meter for battery health, you should check State of Charge and internal resistance directly because voltage alone lies. Use meters that include battery diagnostics modes (SoC estimation and internal resistance/impedance). Example: a pack at 3.6 V per cell may still show high internal resistance — 50 mΩ per cell — indicating aging even though voltage looks OK.
If you want to measure leakage or bonding, follow these steps:
- Isolate the HV system and verify discharge to below 60 V using a proven discharge tool.
- Set your meter to milliohm or low-resistance mode.
- Clamp or probe between pack negative and chassis, then record the value.
- Compare against your threshold (for many EVs, bonding should be >100 kΩ for isolation and <0.1 Ω for protective bonding depending on test type).
Expect price tiers so you buy the right tool for your workload: basic automotive multimeters suitable for low-voltage jobs are usually under $200; mid-range units with some HV features and better accuracy run $200–$600; professional HV meters with CAT IV 1000V ratings, milliohm ranges, and dedicated battery diagnostics typically start above $1,000.
Example: a shop that services hybrid commuter cars might buy a $300 true-RMS meter for general diagnostics, a $600 HV-capable clamp meter for routine current checks, and a $1,200 pro HV meter for full pack diagnostics and bonding tests.
Common Mistakes and Troubleshooting Scenarios to Avoid
Before you work on EV high-voltage systems, know that a wrong test can electrocute you or destroy your tools.
Although you might be tempted to grab a regular multimeter for a quick check, treat EV high-voltage work differently. Use a CAT III or CAT IV meter rated for the voltage and environment, and make sure the meter’s voltage range exceeds the pack voltage by at least 20%. For example, if the pack is 400 V, use a meter with a 600 V or higher DC range. I once saw a tech fry a low-range meter on a 360 V pack because the range wasn’t sufficient.
Why this matters: non-CAT meters and low-range instruments fail catastrophically.
How to avoid it:
- Check the meter’s CAT rating and maximum DC voltage before touching anything.
- Use insulated probes and verify the meter’s fuses are intact.
- Keep the meter’s protective rubber boot on during testing.
Insulation degradation is often invisible, so verify insulation resistance and tiny leakage currents. Use a milliohm meter to check resistance of busbars and connectors, and perform a dielectric (insulation resistance) test at a controlled voltage — for example, 500 V DC for a 400 V pack — to catch small leaks. I once found a hairline insulation crack that showed up as a 50 MΩ leakage at test voltage and later caused arcing under load.
Why this matters: small leaks become dangerous at high volts.
How to avoid it:
- Measure milliohm resistance across conductors; expect low single-digit milliohms on good joints.
- Perform insulation resistance tests with a proper tester and record the MΩ values.
- If leakage shows up, isolate sections and test each module separately.
Connector corrosion can hide high-resistance joints that heat up and fail under load, so inspect, clean, and retest under load conditions. Use a contact cleaner, a brass brush, and torque wrenches to restore and verify connections — tighten to the OEM torque spec, for example 8–12 N·m for M8 studs (check the manual). I once replaced corroded busbar bolts that had a 30 mΩ jump and noted the temperature rise under a 100 A load.
Why this matters: hidden resistance makes faults and heat.
How to avoid it:
- Visually inspect connectors for green/white corrosion or pitting.
- Clean with a non-conductive cleaner, brush gently, reassemble, and torque to spec.
- Retest resistance and run a short current soak (e.g., 50–100 A for a minute) while measuring temperature.
Don’t rely only on software diagnostics; wiring and hardware issues can pass software checks. Combine bench tests with scan-tool data and manual verification. For instance, a CAN fault may appear as an intermittent wiring issue that clears during a self-test but shows up under vibration — I traced one intermittent ground that only appeared when the vehicle hit bumps.
Why this matters: software can miss physical faults.
How to avoid it:
- Read fault codes, then verify suspected circuits with a meter or oscilloscope.
- Wiggle harnesses and reproduce conditions while monitoring voltages and signals.
- Correlate scan-tool timestamps with your test recordings.
Human factors like rushing, complacency, or wrong PPE cause most incidents, so follow procedures and double-check every step. Wear insulating gloves rated for the system voltage, arc-rated clothing if you’re exposed to possible arc flash, and keep one hand away when working inside energized areas. I once stopped a colleague from skipping glove testing before a live probe check; his gloves had a pinhole that passed a pre-job visual check but failed a dielectric glove tester.
Why this matters: PPE and procedure prevent injury.
How to avoid it:
- Inspect PPE before each use: check glove air test and look for cuts.
- Use a buddy system for live work and have an emergency plan.
- Slow down and tick off steps on a written checklist.
Frequently Asked Questions
Can I Safely Use My 12V Automotive Meter on Hybrid Accessory Circuits?
No — I wouldn’t use a 12V automotive meter on hybrid accessory circuits; meter compatibility and safety considerations demand HV-rated (CAT III/IV) or milliohm-capable tools to avoid damage, inaccurate readings, electrocution, or tool failure.
How Often Should HV Multimeters Be Recalibrated for EV Work?
I recommend annual checks for HV multimeters, but I follow manufacturer recommendations strictly; if I use them heavily or after drops, I’ll calibrate more often and document each service to guarantee safe EV work.
Are Insulated Gloves Sufficient Without Cat-Rated Meters?
No — I wouldn’t rely solely on insulated gloves; insulation integrity and glove sizing matter, but you still need CAT-rated meters for HV diagnostics. Gloves supplement PPE, they don’t replace properly rated test equipment or safe procedures.
Can Milliohm Results Vary With Temperature or Clamp Positioning?
Absolutely — I’ve seen milliohm results shift with temperature drift and probe pressure; don’t gamble, because small changes bite you later. I tighten contacts, control temp, and repeat readings to confirm consistent low-resistance values.
Do Insurance Policies Require Documented HV Tool Training for Technicians?
Yes — I require insurance documentation and training verification from technicians; I don’t accept informal claims, so I keep certified records proving HV tool training, competency, and currency to satisfy insurer and safety audit requirements.