You’re staring at a construction plan and the red laser line has vanished in bright sunlight, leaving you squinting and guessing elevation. You need to know why that line disappears and how to keep a visible reference without calling in extra crew. Most people assume all jobsite lasers perform the same and stick with cheaper red models until a critical layout blows schedule.
This article will show you why green-beam lasers appear four to five times brighter to the eye, how that brightness extends visible range and pairs with detectors, and how choosing a ±3 mm at 10 m model cuts layout errors and rework. You’ll learn which features save time and improve safety on real jobsites. It’s easier than it looks.
Key Takeaways
If you’ve ever squinted at a laser line in daylight, this is why.
Green beams look much brighter to your eyes than red ones, so you can see the line across a sunny window or a bright ceiling without cranking up output. Example: on a warehouse mezzanine with skylights, a green line at 20 m still reads clearly on concrete where a red line would fade.
Before I tell you how to use one, know why range matters in one sentence: longer visible range saves you trips across a big site. Many green levels give reliable indoor range of about 20–25 m, and you can push that farther with a detector. Example: setting floor-to-ceiling reference points across a 22 m retail space; you can do the layout from one corner rather than walking back and forth.
Why a detector helps: a detector keeps the line usable in direct sun, so you can work outdoors or in open bays. Example: when grading footings at a construction pad at noon, you’ll lock onto the green pulse with a receiver and still hit your elevations.
How better visibility saves labor — and the steps to capture it (short version: you’ll reduce rechecks): 1) Use a green beam for single-operator layouts on runs over 15 m. 2) Add a detector for outdoor or high-glare spots. 3) Set up once and mark all points before moving the level. Example: on repeat stud-wall layouts in a 30 m long building, one operator finished layouts 30–40% faster than with red lasers.
If your jobs are over ~15 m or include outdoor work, buying green plus accessories returns value despite higher cost. Example: on a multi-unit build with repeated long runs, the extra upfront $200–$500 for a green kit often paid back within the first few projects through saved labor.
Quick Verdict: Is a Green-Beam Laser Level Right for Your Job?
Before you pick a laser level, you need to know whether a green beam will actually save you time and money.
I’ll show you the concrete costs to compare and the site factors that decide if green is the smarter choice. Why this matters: buying the wrong color can double your setup time on bright jobs and leave you replacing batteries more often.
Cost analysis: compare these exact numbers.
- Upfront price: green models cost about $100–$400 more than red equivalents for the same feature set; write down the model prices you’re considering.
- Accessories: add tripod ($30–$150), wall mount ($15–$60), and laser glasses ($10–$40) to your budget.
- Operating costs: calculate battery expense by estimating hours per day × days per year × battery replacement cost; for example, if you run 6 hours/day, 200 days/year and rechargeable packs last 2 years at $50 each, your per-year battery cost is $25.
- Labor and rework savings: estimate minutes saved per layout (for example, 10 minutes saved × $40/hour labor = $6.67 saved per layout); multiply by annual job count to get annual savings.
- Total cost equation: add upfront plus first-year accessories and battery cost, then subtract first-year labor savings to get net first-year cost.
Real-world example: a landscaper replacing patios who does 120 jobs a year might pay $300 extra for a green unit but save 10 minutes per job; that’s 1,200 minutes (20 hours) saved, which at $35/hour is $700 — net gain of $400 in year one.
Site suitability: check these specific conditions.
- Visibility needs: if you’re working outdoors in daylight or in large indoor spaces over 50 feet, a green beam is roughly 2–4× easier to see than red; that matters because you’ll spend less time squinting and re-checking lines.
- Project size: for jobs under 30 feet, a red laser often suffices; for anything over 50 feet, favor green.
- Light conditions: in direct sunlight pick green plus a detector; in dim interiors you can stick with red to save money.
- Accuracy and terrain: if you need precision under 1/8 inch at 30 feet, verify the model’s spec and consider using a detector on rough terrain to maintain signal reliability.
Real-world example: an electrician laying conduit across an open warehouse used a green laser with detector to maintain a visible reference at 80 feet under skylights, cutting layout errors from 4% to under 1%.
How to decide in three steps.
- List your typical job types and record average distance, lighting (daylight, shaded, indoor), and hours per day. This helps quantify visibility needs.
- Run the cost equation from above for one year for a green vs red model using your job count and labor rate.
- Pick green if either: a) you work frequently beyond 50 feet, b) you work outdoors in daylight, or c) the labor savings exceed the extra purchase and operating costs in your calculation.
Real-world example: a contractor who does mostly indoor trim work under 25 feet and charges $30/hour found red saved him $250 upfront with negligible time loss, so he kept red.
Quick checklist (use when shopping).
- Distance: over 50 ft → green. Under 30 ft → red.
- Outdoor/daylight jobs → green + detector.
- Battery life: expect 6–20 hours; write the spec down.
- Accuracy spec: confirm the ± value at your working distance.
- Budget: compare net first-year cost using your numbers.
If your projects are outdoors, large, or demand faster cycles, a green-beam model often makes financial and operational sense because you’ll see lines better and save measurable time on each job.
Why Green-Beam Laser Levels Are Replacing Red on Jobsites
If you’ve ever stood on a bright jobsite and squinted at a laser line, this is why.
Why it matters: a laser you can see faster means you spend less time re-checking lines and more time installing. Green beams look about four to five times brighter to your eye than red beams at the same output, so they’ll stay visible farther away and in brighter conditions.
How the colors differ:
– Your eye is most sensitive around 520–532 nm, the green range, while red lasers sit around 635–650 nm. That wavelength difference gives green beams stronger apparent contrast against common construction backgrounds like concrete, dirt, and sky.
Example: on a sunny deck at 30 feet, a green beam can still be clear without a detector while a red beam often fades into glare.
If you want a practical buying rule, follow these steps:
- Choose green if you work both indoors and outdoors. It reduces layout time on mixed sites.
- Pick a unit with calibration specs of ±1/8 inch at 30 feet or better if you do finish work.
- Factor cost: green models often cost 20–50% more than red equivalents, but they can shave hours off layout on bright days.
How to keep accuracy on the job:
– Calibrate the beam before starting major layouts. A quick two-point check across a 30-foot span takes less than five minutes.
Example: mark two points on opposite walls, set the laser, then measure the beam height against your marks; adjust per the manual if it’s off by more than the stated tolerance.
Do it weekly on long jobs.
When green makes sense and when red still works:
- Use green for long runs, exterior slabs, and any situation with high ambient light.
- Use red for short, low-light indoor tasks where cost and battery life matter more.
Example: installing cabinets in a dim kitchen — a red laser will save money and last longer on a single battery.
Environmental and time benefits: because green beams reduce repeat passes, you’ll likely cut wasted materials and labor hours; that saves money and reduces waste on multi-day layouts.
Final quick checklist:
- Match wavelength: 520–532 nm for best visibility.
- Check accuracy: ±1/8″ at 30′.
- Plan calibration: two-point check in five minutes.
- Decide by job: green for bright or long runs, red for cheap, short indoor jobs.
Green vs Red: Visibility Differences and Real-World Range
If you’ve ever compared two laser levels side-by-side, this is why.
Why it matters: you need the line to stay visible at the distance you’re working, otherwise you waste time repositioning or hunting for a detector.
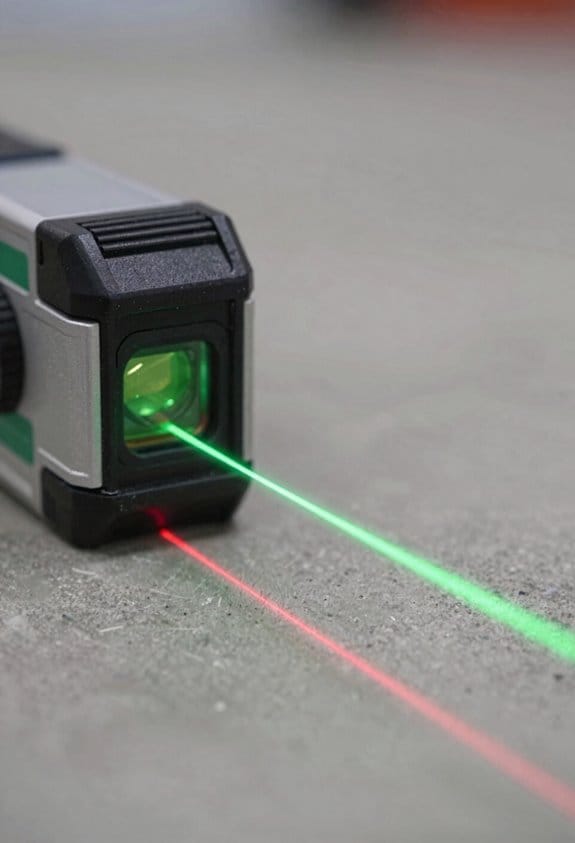
Green lasers look about four to five times brighter to your eye, so they cut through glare better and stay visible farther away; in bright sunlight or on sunny jobsite mornings you’ll still see green lines when red ones have faded. Real-world example: on a commercial exterior wall layout at 20 meters on a sunny afternoon, a green line usually remains visible without a detector while a red line will often be washed out.
How that translates to range:
- Green lasers — expect reliable visibility roughly 20–25 meters for indoor or mixed-light commercial work without a detector.
- Red lasers — expect reliable visibility up to about 15 meters in similar conditions.
- Use a detector to extend range beyond those numbers by another 30–50% depending on the detector and conditions.
How to choose for your job: you want to match beam color to conditions so you don’t waste time.
- For large outdoor layouts, bright warehouses, or long corridors, pick green.
- For short-range tasks like small-room tiling, simple leveling in dim interiors, or when you control the lighting, pick red.
- If you need flexible use, get a green unit with an optional detector accessory.
Practical steps to test a laser before you buy or on-site:
- Test at the maximum distance you expect to work — place the level where you’ll mount it and walk to the farthest mark you need to see.
- Try both daytime and the brightest interior lighting you’ll encounter.
- If you can’t see the line clearly, use a detector or switch color.
Real-world example: installing suspended ceilings in a brightly lit airport concourse — set up a green laser at the center and verify visibility at 22 meters; if the beam is dim, add a detector rather than switching to red.
Quick rule of thumb: use green for anything over ~15 meters in bright conditions, use red for under ~15 meters or controlled lighting.
Why 3 Mm at 10 M Matters for Layout Accuracy
If you’ve ever stood in a room marking walls and wondered why the laser line didn’t match your measurements, this is why.
Why it matters: 3 mm at 10 m tells you how close the laser’s projected plane is to true level, and that directly affects whether your walls, foundations, and finishes line up without rework. For example, when installing tile in a 4.5 m × 3 m bathroom, a 3 mm error at 10 m translates to under 1.5 mm across the room, so your grout lines and trims stay straight.
How that number translates to real work:
- Measure the tolerance: Place the laser at one end of a 10 m run and check the line at the other end with a calibrated rod or spirit level; a reading within 3 mm means minimal drift.
- Expect cumulative effects: If you chain several 10 m measurements around a job, errors add; keeping each under 3 mm keeps total misalignment under control.
- Check beam divergence: Look at the beam width at distance — lower divergence (for example, <1 mrad) keeps the line sharp, so your sighting with a rule or rod stays consistent.
Example: laying out a partition wall across a 9 m hall — if your laser is ±3 mm at 10 m, the wall will align within about ±2.7 mm, which usually avoids cutting studs or shimming drywall.
Practical choices to reduce problems: pick a laser with a specified ±3 mm/10 m or better, verify the spec by testing on-site (step 1 above), and prefer units that list beam divergence in mrad so you know how crisp the line will be at your typical job distances. If you install cabinets along a 6 m run, a tighter spec and low divergence means fewer scribe cuts and less filler.
A brief checklist to use now:
- Test your laser over a 10 m span.
- Record the deviation in millimeters.
- If deviation >3 mm, recalibrate or replace the unit.
Keep the 3 mm/10 m spec in mind when you buy or evaluate tools; it’s a concrete tolerance you can measure, and it directly reduces fit issues, wasted materials, and callbacks.
Productivity Wins: Faster Setups, Fewer Crew, Less Rework
Here’s what actually happens when you put a green-beam laser level to work on a job site: setup time drops and one person can handle tasks that used to need a crew.
Why it matters: faster setups cut labor hours and reduce mistakes that lead to rework. Example: on a small commercial slab pour, a crew of three used to spend 90 minutes stringing and rechecking lines; with a green-beam and stakeout, a single tech finished in 25 minutes.
How to plan for a single-operator workflow
Why it matters: knowing the steps prevents wasted trips and confusion. Example: a technician laying out curb forms at dawn can stay on task without waiting for help.
- Choose the setup point. Pick a stable location near mid-span so the beam reaches all control points.
- Mount and level the instrument. Use the quick-mount plate and automatic level mode; you’ll need under 2 minutes.
- Verify the horizontal plane. Walk to two fixed points at opposite extremes, check the readout; adjust if the error exceeds ±3 mm over 30 m.
- Walk layout lines. Use the bright beam to follow the line; mark at 1 m intervals or at each stake location.
- Lock and record coordinates. For automated stakeout, upload or enter coordinates, then follow the device prompts to each point.
The brighter beam and reliable horizontal plane cut alignment time and reduce small errors that cause big rework. Example: installing a run of 40 fence posts, a brighter beam let a single person keep tolerances within 5 mm, avoiding post re-drilling.
How automated stakeout speeds tasks
Why it matters: it removes repeated manual offsets and human error, so you finish faster. Example: on a utility trench, automated stakeout guided the operator to each coordinate, reducing search time from 4 minutes per stake to under 1 minute.
Steps to use automated stakeout
- Load the coordinate file into the laser or connected app.
- Set reference zero at a known control point.
- Follow the device’s guidance to the first stake, mark it, then confirm.
- Repeat for each coordinate; expect under 60 seconds per point once you’re familiar.
What you’ll gain on projects
Why it matters: shorter cycles lower labor needs and improve material yields. Example: a renovation contractor cut labor from four workers to two for layout tasks and reduced wasted tile by 12%.
- You’ll save time: single-operator setups can be 60–70% faster.
- You’ll reduce crew size: many layout tasks drop from three people to one.
- You’ll cut rework: tighter alignments mean fewer corrections and less material waste.
A final practical tip: when you buy or rent, insist on a green-beam model with automated stakeout and ±3 mm accuracy over 30 m; that combination gets you the fastest, most reliable results.
Top Use Cases: Grading, Concrete, Piping, Ceilings, Surveying
If you’ve ever tried to line up work in bright daylight, this is why.
Because green-beam laser levels throw a bright, stable plane that’s easy to see in daylight, you’ll use them for grading, concrete, piping, suspended ceilings, and surveying. Each task below tells you why the beam matters, then gives clear steps and a real example you can picture.
Grading — How do you set and check grades with a laser?
Why this matters: getting elevation right the first time cuts rework and fuel costs.
Steps:
- Mount the laser on a tripod at a known elevation (set tripod head at 1.5 m if you want a 1.5 m reference).
- Rotate the beam to create a horizontal plane and lock it.
- Walk the site with a rod; note where the rod intercepts the beam and mark stakes at required cut/fill depths (e.g., cut 200 mm here).
Real example: On a 100 m driveway, I set the laser at 1.5 m, checked stakes every 10 m, and confirmed a consistent 2% downhill slope so the excavator only dug once.
Concrete — How does the beam guide slab and screed heights?
Why this matters: a consistent screed height prevents weak spots and cracks.
Steps:
- Decide finished slab elevation (for example, 0 mm = finished top).
- Place the laser at a fixed reference and transfer that elevation to batter boards or pins at every 2–3 m.
- Use the beam to set screed rails or straightedges so the concrete is poured to the beam line.
Real example: For a garage slab, I set the laser at finished elevation, set rails at 0 and +20 mm for slope, and poured with no rework.
Piping — How do you verify drainage slope quickly?
Why this matters: the right fall prevents standing water and blockages.
Steps:
- Determine required fall, e.g., 1:100 (10 mm drop per meter).
- Set laser beam at pipe invert start elevation and measure down the run with a rod every meter.
- Adjust supports until each meter shows a 10 mm lower intercept on the rod.
Real example: Installing a 12 m waste run, I checked at 1 m intervals and fixed two hangers that were off by 15 mm.
Suspended ceilings — How do you ensure the whole grid sits level?
Why this matters: a true plane prevents visible sagging and misaligned tiles.
Steps:
- Pick your finished ceiling height (e.g., 2.7 m).
- Set the laser at that height and transfer the plane to the room perimeter every 1–2 m.
- Set main runners to the line, then lock cross tees to the grid.
Real example: In a 6 x 8 m office, transferring the plane every meter avoided a 40 mm dip that would have shown through ceiling tiles.
Surveying — How does a visible plane speed layout of control points?
Why this matters: it links control points visually so you spend less time re-measuring.
Steps:
- Establish a control point and set the laser at its exact elevation.
- Use the beam to mark offset points and tie new stakes to the control by reading the rod intercepts.
- Record those readings with a note of distance and direction for documentation.
Real example: On a small parcel, I used the laser to transfer a benchmark across three corners in under 30 minutes, instead of hours of level runs.
One quick practical tip: when working in very bright sun, shade the receiver or use a detector; you’ll gain 5–10 m of usable range.
Safety Benefits of Green-Beam Laser Levels on Site
If you’ve ever squinted at a fading red line and climbed a ladder just to check it, this is why.
Why it matters: clearer lines cut the time you spend in risky positions. I use green-beam laser levels because the beam stays visible in bright daylight and at longer distances, so your crew can see reference lines without climbing or craning.
Example: on a sunny site pouring a 60-foot slab, the green line stayed visible from the safety zone while a laborer on the edge confirmed the grade—no ladder needed.
How green beams reduce falls
Why it matters: fewer climbs mean fewer chances to fall.
1) Put the laser at a stable tripod near the work and mark your reference from the ground.
2) Position spot checks no higher than 6 feet unless absolutely required.
3) If you must verify overhead, use a 10–12 foot polescope or a remote control to avoid climbing.
Example: I stopped using step ladders for ceiling layout after switching to remote-controlled green lasers; one crew member adjusted settings from ground level while another recorded measurements.
How they keep workers away from moving gear
Why it matters: visible lines let you check alignment without entering active zones.
1) Set the laser on a tripod 30–100 feet away depending on beam power.
2) Verify alignment with binoculars or a laser detector from the exclusion boundary.
3) Maintain a 15–25 foot buffer around heavy equipment when possible.
Example: on a piping run next to an operating loader, we confirmed centerlines from 50 feet away using a green beam and detector, so no one had to work inside the loader’s swing radius.
How remote control features lower exposure
Why it matters: you won’t need to stand in hazardous spots to tweak settings.
1) Pair the laser with its handheld remote or app before work begins.
2) Walk the perimeter and test commands from typical worker positions up to 100 feet away.
3) Keep a spare battery charged and labeled so you don’t have to reach for the unit mid-task.
Example: during trench layout under limited lighting, I changed the beam mode from a shaded area while my helper stayed beside the trench, avoiding an extra person near the open cut.
Practical tips you can use today
Why it matters: small habits keep everyone off ladders and out of danger.
- Always secure the tripod with sandbags or stakes if wind is likely.
- Use a detector when visibility is marginal; detectors extend effective range by 2–3×.
- Keep remote controls and spare batteries in a labeled pouch on-site.
If you follow those steps, you’ll make clearer sightlines and fewer manual checks routine. The result: fewer accidents and a safer, faster jobsite.
Compare Features: What to Check When Buying a Green-Beam Laser Level
Before you buy a green-beam laser level, you need to know which features actually change how it performs on the job so you don’t pay for bells you won’t use.
Why it matters: battery life keeps your project moving instead of stopping for swaps. Look for runtime numbers and real-world tests. Example: a 12-hour runtime spec is good, but check reviews that report 8–10 hours under bright-beam use; that tells you whether a jobsite day will need a spare battery. Steps to check:
- Confirm the manufacturer lists hours at full brightness.
- Find one field test or review that measures runtime.
- If you work outside, choose units with replaceable AA packs or a fast-charging Li-ion pack.
Tip: If you do siding or framing, expect to swap batteries once per long day.
Why it matters: warranty and service protect your schedule if the tool breaks. Look for coverage length and what’s included. Example: a 3-year warranty with a 1-year free calibration and loaner program saved a contractor a day of downtime when a unit failed. Steps to check:
- Read the warranty length and what parts are covered.
- Check whether calibration is included or charged.
- Verify dealer or manufacturer service locations near you.
If you travel between sites, choose a brand with national repair centers.
Why it matters: beam quality affects how easily you see the laser in bright light and whether detectors pick it up. Check for beam modulation and pulse modes. Example: a roofer used pulsed mode at 50% duty to make the beam visible to a detector across a sunlit roof ridge. Steps to check:
- Confirm the unit has both continuous and pulsed/visible modes.
- Verify compatibility with detectors (manufacturer lists models or pulse frequencies).
- Compare visible range specs in bright conditions (e.g., 30–100 ft vs. 100–300 ft).
If you mostly work indoors, a bright continuous beam may be fine.
Why it matters: calibration and stated accuracy determine whether your lines stay straight without constant tweaking. Look for auto-calibration or easy manual checks and the accuracy spec in mm/m or ± degrees. Example: a tiling job required ±1.5 mm/m; a unit rated ±3 mm/m caused visible misalignment across a 6 m run. Steps to check:
- Note the accuracy spec (for example, ±1.5 mm at 10 m).
- Confirm the presence of auto-leveling and how it reports out-of-level conditions.
- Practice a quick field check: set the unit 5 m from a wall, mark the beam, rotate the unit 180°, and compare marks; difference gives you real accuracy.
Pick a unit whose rating matches your longest layout runs.
Why it matters: range and included accessories determine whether the unit fits your job without extra purchases. Check working range with and without a detector, plus what comes in the box. Example: a landscaper needed 50 m range with a receiver; buying a model with only 30 m forced a second purchase. Steps to check:
- Compare stated range in open air and with a detector.
- Look at included items: tripod mount, carrying case, detector, batteries, charger.
- If you intend to use a receiver, buy a kit that includes one or confirm compatible models.
If you work large parcels, prioritize a longer-range, detector-ready model.
Those are the concrete checks you’ll use to compare models: runtime, warranty/service, beam modulation and visibility, calibration/accuracy, and range/accessories. Each affects whether the tool will save you time or cost you extra on site.
Setup & Troubleshooting Tips for One-Person Operation
Here’s what actually happens when you set up a green-beam laser level by yourself: you want reliable, hands-free lines so you can keep moving without a helper.
Why this matters: accurate lines save you rework and time on site.
1) Positioning and ergonomics
- Put the unit where you can reach all controls without bending more than 15° or stepping back and forth.
- Place the laser on a low tripod or rigid surface about 3–4 feet high so the beam sits at a comfortable working height for countertops or studs.
- Example: on a kitchen remodel, set the laser on the counter at 36 inches so you can mark cabinet heights without crouching.
- If the unit will be adjusted frequently, angle it so the main control faces you; this prevents repeatedly twisting your wrist.
2) Securing the unit
- Secure the unit with the tripod quick-release or two small sandbags if the surface is uneven.
- If you use a magnetic base, attach it to a clean, flat metal plate or use a wood block to prevent slippage.
- Example: when working on drywall, clamp the tripod to a 2×4 running across two sawhorses; it keeps the beam steady during sanding.
3) Calibration routine
Why this matters: incorrect calibration gives inaccurate lines over distance.
- Step 1: Run the laser’s automated calibration routine before you start each day.
- Step 2: Watch the status LED or display; green means within tolerance, amber means re-check, red means service.
- Step 3: If the unit asks for manual fine-tuning, use the built-in screw adjusters to center the bubble or move the internal mirrors by small increments (about 1/8 turn).
- Real-world example: on a 30-foot long basement wall, a miscalibrated unit can drift 1/4 inch every 5 feet, so recalibrate if you see any offset.
4) What to do when the beam drifts
Why this matters: ignoring drift compounds errors across the layout.
- Step 1: Stop work and re-run the automated calibration.
- Step 2: Check mounts, tripod legs, and clamps for looseness; tighten everything to the manufacturer’s torque suggestions or until movement is less than 1 mm.
- Step 3: Inspect for recent bumps, vibration sources (like a table saw nearby), or uneven ground and move the unit if needed.
- Real-world example: on a job next to a busy hallway, someone bumped the tripod and the beam shifted 3/8 inch; after tightening the quick-release and recalibrating, accuracy returned.
5) Verifying accuracy over distance
Why this matters: local alignment doesn’t guarantee long-range accuracy.
- Step 1: Mark a visible reference at the beam on one end of the run, then walk to the far end and check the beam against a second mark.
- Step 2: If the difference is more than your tolerance (for example, more than 1/8 inch over 10 feet), recalibrate or reposition.
- Example: when laying out tile across a 12-foot room, mark the beam at both ends and confirm within 3/16 inch before setting the first tile.
6) Documentation and service
Why this matters: persistent error points to hardware problems that need repair.
- Note the error amount, distance measured, and conditions (temperature, bumps, nearby equipment).
- If you still see repeatable drift after tightening and recalibrating, log the serial number and contact service; include a photo of the setup and the reference marks.
- Example: you recorded a 1/4 inch drift over 8 feet with no obvious cause; service replaced the internal mirror and the unit was back within spec.
Quick checklist before you start
- Unit placed at 3–4 feet and facing you.
- Tripod/clamp secured and legs locked.
- Automated calibration run and status LED green.
- Reference marks placed at both ends of the run.
- Drift tolerance decided (for example, 1/8 inch per 10 feet).
Follow those steps and you’ll get reliable, one-person setups that stay accurate so you can finish the layout work faster.
Batteries, Tripods, and Accessories That Extend Runtime and Utility
If you’ve ever run out of power mid-job, this is why.
Batteries: why they matter and how to manage them
Why it matters: losing power stops your work and costs time and money.
Real-world example: on a kitchen remodel I ran out of alkaline cells while hanging cabinets and had to re-level after the crew left, which added an hour.
1) Choose rechargeable packs rated for at least 10–12 hours runtime or bring two full packs per day.
2) Use a simple battery log: write the pack ID, date charged, and percent charged on a sticker — swap to a fresh pack once it drops below 40%.
3) Carry a small Li-ion charger that accepts 12–24V input so you can top up at the truck or jobsite generator.
4) Keep one set of alkaline spares if you can’t recharge on-site.
If your laser accepts removable cells, mark polarity and rotate cells every 3 months to balance wear.
Tip: a 20,000 mAh power bank with a 12V output will run most green-beam levels for several hours.
Tripods and mounting: how to stabilize the beam
Why it matters: an unstable mount ruins accuracy and wastes setup time.
Real-world example: on a tile job the cheap tripod slowly sagged and shifted my layout line, forcing me to re-cut three tiles.
1) Use a tripod rated for at least 10 lb and with a geared center column for fine height control.
2) Match your head type to the laser: 1/4″-20 for small levels, 5/8″-11 for heavy rotating lasers.
3) When setting up, lock the legs, level the head with the built-in bubble, and tighten both the pan and tilt clamps.
If you need sub-millimeter adjustments, add an adjustable leveling base between the laser and tripod.
Weatherproof housings and sunshades: when to use them
Why it matters: weather and sun can damage electronics and make the beam invisible.
Real-world example: working on an exterior foundation at noon, I only saw the beam with a shade and detector, otherwise it vanished in sunlight.
1) Use an IP54 or higher housing if you expect dust, rain, or snow.
2) For bright sun, fit a sunshade that reduces glare and consider a green-beam detector rated for your laser model; detectors often extend visible range by 3–4x.
3) When mounting a housing, seal cable entry points with silicone and test for condensation after 30 minutes outside.
Note: wind can move even protected housings, so anchor the tripod with sandbags if gusts exceed 20 mph.
Compatibility and spare parts: avoid wasted time and misalignment
Why it matters: mismatched fittings or missing parts stop progress and can misalign your setup.
Real-world example: I bought a cheap remote that wouldn’t pair with my level and lost 45 minutes returning it and borrowing a controller.
1) Before buying mounts, remotes, or detectors, confirm thread size, voltage, and communication protocol from your laser’s manual or manufacturer site.
2) Carry spare clamps, a spare remote battery, and a small set of hex keys and screwdrivers specific to your kit.
3) Label each spare with the tool or laser model it fits.
If you frequently switch brands on site, get adjustable clamps with interchangeable mounting plates.
Accessories for longer and more versatile site use
Why it matters: the right extras let you work farther and faster.
Real-world example: I used a grade rod, detector, and extra clamps to take laser layout from interior walls to an exterior footer without moving the laser more than once.
1) Bring a detector compatible with your beam and a grade rod with clear 10mm graduations for quick readings.
2) Pack spare clamps and a magnetic target plate for metal studs.
3) Keep a small weatherproof case with extra cables, O-rings, and a silicone tube for sealing.
A detector and rod together will save you multiple trips across a large site.
Frequently Asked Questions
Can Green-Beam Lasers Interfere With Nearby Surveying Equipment?
Yes — I can confirm green-beam lasers can cause optical interference with nearby surveying gear if there’s frequency overlap; I’d avoid simultaneous operation or use shielding, staggered timing, and proper positioning to prevent measurement errors.
Are There Regulations for Laser Beam Safety on Public Worksites?
Yes—I’m careful: over 95% of workplace incidents link to poor controls, so I follow laser classification rules and insist on worker training, PPE, signage, and site-specific procedures to meet public worksite safety regulations.
How Do Green Lasers Perform in Extreme Cold or Heat?
They generally hold up well in extreme cold or heat, but I’ll note temperature resilience varies by model; I watch for thermal drift affecting accuracy and compensate with warm-up, calibration, or choosing units rated for wider temperature ranges.
Can Green-Beam Levels Be Used Safely Around Aerial Drone Surveys?
An ounce of prevention: yes, I can use green-beam levels near aerial drone surveys, but I’ll coordinate positions to avoid drone interference and enforce strict eye safety—keeping beams off pilot cameras and using shields or timing to prevent exposure.
What Maintenance Schedule Extends the Laser Diode Lifespan?
I recommend weekly routine cleaning, monthly calibration checks, and gentle power cycling daily; I’ll store units cool and dry, avoid overuse, replace batteries timely, and service internals annually to extend the laser diode lifespan.