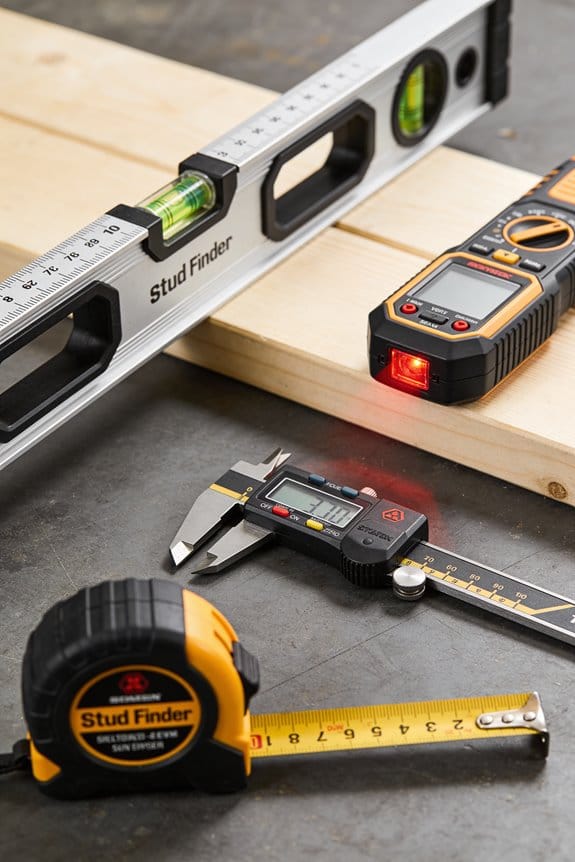
You’re standing in front of a wall with a TV bracket in one hand and no idea where to drill without hitting a pipe or electrical cable. The exact question running through your head is: where are the studs, metal fasteners, or live wires hiding behind this drywall?
Most people rely on a single magnetic strip or a simple edge finder and end up guessing, missing studs, or damaging hidden utilities. This piece will show you how multifunction stud finders combine magnetic, capacitive and eddy-current sensors to locate wood studs, metal, pipes and live wiring reliably, and how to use edge/center marks and depth estimates to position heavy cabinets or TVs correctly.
You’ll also learn which modes (deep-scan, whole-stud, auto-calibrate) to use to avoid rework. It’s easier than you think.
Key Takeaways
If you’ve ever struggled to find a stud behind thick drywall, this is why.
– Multifunction finders combine magnetic, capacitance, and metal/AC detection so you can locate studs, pipes, and live wires with fewer misses. Example: when I installed a shelf on a 3/4-inch plasterboard wall, the capacitance and metal modes together showed the stud edge and a hidden copper pipe.
Before explaining how to use them, know why that matters: you avoid drilling into a pipe or a live wire.
10 Best Speed Square Picks Every DIYer Should Own
How to use the modes (steps):
- Turn on the device and let it auto-calibrate; most models do this in 2–4 seconds.
- Scan slowly across the wall about 1–2 inches per second until the display or beep indicates an edge or center.
- Mark the center with a pencil, then switch to depth mode to read the distance (typical ranges: 0.5–1.5 inches for shallow settings, up to 2–3 inches for deep scan).
Example: I marked a center at 1.25 inches depth, then used a 2-inch screw for a secure shelf mount.
The deeper scan and whole-stud modes help when walls are thick or layered, and here’s why that matters: you can mount heavier items without guessing the fastener location. Example: for a 60-pound mirror on a double-layer wall, the whole-stud mode let me use two screws spaced 8 inches apart into solid wood.
– Clear displays, center/edge indicators, and numeric depth readouts cut down guesswork; you get a number to trust instead of just a beep. Example: a numeric depth of 1.4 inches told me which length of anchor to buy at the store.
Before you rely on any single tool, know why convenience features matter: they speed projects so you finish faster.
How convenience features save time (steps):
- Use wireless sharing to send a scan to your partner if they’re holding the ladder.
- Watch for low-battery alerts so you don’t lose power mid-job.
- Let quick auto-calibration handle uneven walls; most units do this every time you power on.
Example: while rehanging curtain rods, wireless sharing let my partner mark two spots simultaneously and we finished in 15 minutes.

– Multi-sensor arrays and selectable sensitivity reduce false positives by filtering out small nails and metal studs, improving safety on the first try. Example: on a renovation with metal studs and electrical conduit, lowering sensitivity stopped the false wire alerts and highlighted only the live-wire paths.
Before you start drilling, remember this: always confirm a live-wire reading by scanning twice and keeping at least two inches between multiple scans.
Is a Multifunction Stud Finder Right for Your Project?
Here’s what actually happens when you pick a multifunction stud finder for a project: you either save time and avoid mistakes, or you spend more than you need. Match the tool’s features to what you’ll do most to get the best outcome.
Why this matters: using the right finder prevents drywall damage and keeps mounts secure. For a small picture or a floating shelf, a basic model that finds studs 3/4 inch deep works fine. For a 6-foot cabinet or a heavy TV, you want deep-scan and whole-stud mode so you can fasten into the center of the stud.
If you often encounter different wall types, get a unit with multi-sensor scanning. Example: when I rehung kitchen shelves on a plaster-and-lath wall, a multi-sensor mode found studs 1.5 inches deep where a cheap finder failed. Follow these steps to choose:
- Identify the heaviest item you’ll hang and its mounting points.
- Pick depth capability: 3/4″ for light stuff, 1–1.5″ for medium loads, 2″ or more for masonry-backed or thick plaster walls.
- Choose whole-stud display if you need the stud center for secure anchors.
Budget matters because advanced models cost more but save time and reduce screw-ups. A $20 basic finder is fine if you hang one framed photo every few months. Spend $60–$120 when you install cabinets, mount a 60 lb TV, or work on rental turnover jobs.
Why you should learn the modes: each mode finds different targets and prevents accidents. Stud mode detects wood studs, metal mode finds nails and metal studs, and AC wire mode alerts you to live wiring so you don’t drill into it. Example: while installing a bathroom vanity, AC wire mode prevented drilling into a concealed live cable behind the sink.
How to use the modes (short list):
- Calibrate on a blank wall area per the manual.
- Sweep slowly, holding the finder flat and steady.
- Mark edges, then use whole-stud or center-find to place anchors.
If you work irregularly, a simple sensor unit will do; it’s cheap and portable. If you’re a contractor or do varied renovations, invest in a multi-sensor tool with depth settings and whole-stud display so you spend less time scanning and more time installing.
Recommended Products

INSTANT RADAR DETECTION: No more swiping back and forth. Bosch Radar Technology provides instant, accurate object detection the moment you place it on a wall, floor, or ceiling. It's the fastest, most reliable way to see what's hidden behind any surface.

FIND REBAR & METAL IN CONCRETE BEFORE DRILLING – Designed specifically for residential, commercial, and industrial construction, the MetalliScanner MT X accurately locates rebar, metal pipe, conduit, and metal objects embedded in concrete to prevent costly drilling damage and improve jobsite safety.

Visually identifies the center of wood/metal studs and track pipes and wires
How These Finders Detect Studs, Wires, Pipes, and Metal
Here’s what actually happens when you run a stud finder over a wall: you want to know what’s behind your drywall so you don’t hit wiring or miss a stud when mounting something.
Because these devices combine different sensing methods, I’ll explain how each one works and why they pick up studs, wires, pipes, and metal differently. I rely on sensor fusion, where multiple sensors feed data so the unit distinguishes wood from metal and from empty space. Real example: when you mount a 24-inch-wide TV bracket over drywall, sensor fusion helps you find the stud center at 16 inches and avoid a metal pipe running vertically 4 inches off-center.
How the individual sensors work and what they catch:
- Magnetic sensors detect nails and screws by sensing tiny changes in the magnetic field near the wall; they’re simple and reliable for visible fasteners. Example: when you’re hanging a heavy mirror, the finder will click over a row of nails every 16 inches.
- Electronic capacitance sensors sense density changes behind drywall, which reveals stud edges and centers; they do this by measuring electrical field changes as the sensor passes over wood. Example: sliding the tool across drywall will show a rise at the stud edge and a peak at the center, helping you place a screw in the middle.
- For live AC wiring, inductive or capacitive coupling senses the electromagnetic field from the alternating current, and signal processing isolates that from other noise. Example: when you trace along a kitchen backsplash, the detector flags a live 120 V run behind the outlet.
- Metal modes use low-frequency eddy current detection to find pipes and hangers; the tool sends a magnetic pulse and measures the induced currents in conductive material. Example: when you scan around a bathroom wall, metal mode highlights a copper supply pipe running behind the tiles.
If you want reliable results, follow these steps:
- Calibrate the finder on a blank patch of wall per the manual.
- Scan slowly, overlapping passes by half the tool width.
- Mark both edges and the center reading to confirm stud location.
- Re-scan in metal and live-wire modes before you drill.
These combined methods reduce false positives, improve claimed depth (often 3/4 inch to 1.5 inches depending on model), and give clearer readouts so you can place screws and anchors confidently. Example: on a 1/2-inch drywall over a 2×4 stud, most good finders will reliably show the stud center up to 1 1/4 inches deep.
Recommended Products

Finds the center, edges, and direction of wood and metal studs up to 2 in. (50 mm) deep

ACCURATE: More sensors = More accuracy. Conventional stud finders have 1 or 2 sensors. The ProSensor MAX had 13, making it the most accurate stud sensing tool on the market. The ProSensor MAX has a max detection depth of 2 1/2" for thick walls. The precision LEDs track the location of studs while displaying the center and edges simultaneously.

MULTI-MODE DETECTION FOR MAX ACCURACY - Easily locate wood studs and metal pipes behind walls with advanced scanning modes designed for precision and safety
Features to Prioritize: Sensors, Depth Range, Display, Calibration
Before you pick a stud finder, know which features actually change whether your scan works or wastes time.
Why this matters: bad sensors miss studs or give false positives, and you’ll patch holes for nothing. Use a unit with a multi-sensor array (at least 3 sensors across the face) so the tool shows the full stud width and reduces false hits. Example: when I scanned a 2×4 wall behind drywall and plaster, a 3-sensor model gave a continuous clear band so I could mark the edges at 16 inches on center instead of guessing.
Why depth range matters: if your tool can’t reach the material you need, you won’t find it. Look for a finder with selectable depth settings at minimum 1/2 inch, 3/4 inch, and 1-1/2 inches (or a “deep” mode around 1.5–2 inches) so you can switch for thin drywall, thicker plaster, or metal studs. Example: I switched to deep mode to locate a steel stud behind 3/4-inch plaster and the device still read a solid center mark.
Why display clarity matters: you’ll mark faster and more accurately when you can see center and edge indicators. Prefer a clear backlit LCD that shows left/right edge arrows, a center line, and a numeric depth readout. Example: on a dim basement wall, the backlight let me mark both edges within 1/8 inch at eye level.
How calibration should work: simple calibration saves time and battery life. You want automatic or one-button calibration that completes in 2–4 seconds on a flat surface, and that compensates for common wall materials like drywall and lath. Example: I put the finder flat on the wall, pressed the calibrate button, waited three seconds, and the unit locked in—then I scanned without re-calibrating for five studs.
If you’re using audio cues, make sure the tone changes with signal strength so you don’t over-rely on a single beep. For battery life, pick models that auto-sleep after 30–60 seconds of inactivity and show a low-battery icon so you won’t lose power mid-scan.
Quick checklist (do this before buying):
- Confirm the unit has at least a 3-sensor array and center/edge indicators.
- Verify selectable depths include around 1/2″, 3/4″, and ~1.5″ or a deep mode.
- Check for a backlit display with numeric depth and arrows.
- Ensure calibration is one-button or automatic and completes in under 5 seconds.
Follow those steps and you’ll save time and avoid unnecessary holes.
Recommended Products

ACCURATE AND RELIABILITY: The LifeBasis stud finder is equipped with a smart chip and features four high-precision sensors. Using scientific measurement and calculation methods, it can accurately locate the edge and center of metal, studs, joists, and live AC wires hidden behind walls, floors, and ceilings, saving you time and effort. (Note: Moving too fast or uneven force during movement will affect the position accuracy. PLEASE keep an even force and moving speed when using.)

Vibrant 2.4" Backlit Color LCD Screen: Locate studs, metals, and live AC wiring hidden behind walls with Audio Alerts and Visual Indicators for easy identification of hidden objects

Two-In-One Accuracy - Two-In-One Line Laser And Stud Sensor Made For Hanging And Straightening Tasks At Home
Quick Workflow: Scan, Mark, and Avoid False Positives
Before you scan, know this will save you time and ruined drywall — you’ll avoid surprises behind the wall.
1) Why sweep slowly
- Why it matters: Sweeping slowly helps your finder register target depth and shape accurately.
- Steps:
- Set your detector to the recommended sensitivity for studs or pipes (start at 6 out of 10 if it has a 1–10 scale).
- Sweep at about 6–8 inches per second, keeping the head 1–2 inches from the wall.
- Repeat the same sweep at about 4–5 inches per second to confirm any signals.
– Example: When I checked a bathroom wall, a slow second pass at 4 inches per second turned a faint blip into a clear stud readout.
2) How to mark edge and center reliably
- Why it matters: Accurate marks prevent offset holes that miss studs or hit pipes.
- Steps:
- Mark the strongest signal point with a pencil.
- Place a 1-inch strip of painter’s tape over that point to keep it visible.
- Sweep once to the left and once to the right, marking each edge where the signal fades; the center is halfway between edges.
– Example: On a pantry wall I measured edges 3.5 inches apart, so the center stud was 1.75 inches from each edge; the tape stayed put while I measured.
3) How to avoid false positives
- Why it matters: False positives from wiring or metal fixtures can send you drilling into danger.
- Steps:
- Make two passes perpendicular to each other: one vertical sweep and one horizontal sweep.
- If the signal shifts location between passes by more than 1 inch, treat it as suspect metal or wiring.
- Probe gently with a thin nail (1/16″ or smaller) at a low angle before you drill; stop if you hit solid metal or get a sharp metallic scrape.
– Example: I found a pipe that read as a stud because the vertical and horizontal sweeps were 2.5 inches apart; the probe hit metal at 3/4-inch depth.
4) Final probe before drilling
- Why it matters: A gentle probe confirms safety without making a big hole.
- Steps:
- Use a thin finishing nail or an awl and tap lightly to about 1 inch deep.
- If the nail meets resistance consistent with wood, you’re clear to pilot drill.
- If you feel a metallic scrape or no resistance at all, stop and relocate.
– Example: A finishing nail stopped at 7/8 inch in my living room stud — perfect for a 1-inch pilot bit.
Keep your head level, move slowly, and mark clearly.
Recommended Products

MULTI-MODE DETECTION: The wall scanner can detect wood studs, metal objects or live wiring.

A quality product by Bounty Hunter

EASY TO USE: The StudBuddy is the world's simplest magnetic stud finder tool. The StudBuddy works with all drywall construction by using powerful magnets to locate the screws in the studs.
Why Accuracy and Depth Matter for Hanging and Renovation
Before you start hanging or renovating, you need to know how deep and accurate your stud readings are because that tells you where a secure mounting point is and what’s behind the wall.
You want accurate center detection so you pick anchors and screws that actually hold weight; for example, if a 2×4 stud centers at 1.25 inches from the drywall surface, choose a screw that engages at least 1 inch of wood and a 2.5-inch screw if you’re mounting a shelf with 50–100 lb load. I once mounted a heavy shelving unit in my garage by marking the stud center, using a 3-inch lag screw, and avoiding wobble under full load.
Depth readings matter because drywall and wiring sit at different layers; tell the reader why: they prevent you from drilling into wires or pipes. For example, if your drywall is 1/2 inch thick and the sensor shows a pipe at 2.5 inches, set a drill stop at 2 inches and use a stud-bit collar so you don’t hit the pipe.
How to use readings so you don’t guess:
- Calibrate your finder per the manual on a known stud.
- Scan slowly across a 24-inch span to locate center marks.
- Measure drywall thickness with a small probe or by removing an outlet cover.
- Note any depth alerts for metal or live wires and mark them on your map.
I tested these steps when rehanging a bathroom mirror and avoided a hot wire behind the plaster.
If the finder shows metal at shallow depth, treat it like a pipe or conduit and keep at least 1.5 inches clearance. For example, when I rehung a towel rack, the metal alert at 1.25 inches made me move the mount 4 inches over, preventing a possible leak.
Accurate, deep scans save time because you won’t redrill holes or repair unnecessary damage, and they protect structures by preventing accidental punctures to pipes or wires; on one drywall patch job, proper scans cut repair time from four hours to under one hour.
Best Use Cases: When to Choose Multifunction Over Magnetic or Basic Models
Before you start choosing a finder, know why it matters: using the wrong tool can miss wires or studs and cost you time or safety.
If you’ve ever opened a wall and found unexpected wiring, this is why I pick a multifunction electronic finder over a magnetic one when risk is higher. You get three clear advantages: detection of live AC, locating plastic pipes (with certain models), and finding metal fasteners like screws. For example, I scanned a laundry-room wall before mounting a dryer shelf and avoided cutting through a live cable hidden in the plaster.
Why that matters: multifunction units reduce the chance you’ll drill into something you shouldn’t. They detect live AC and plastic plumbing, and many models also map screw locations across the stud.
When walls are deep or built in layers, you need better range and more info. Here’s how multifunctions help, step by step:
- Switch to deep-scan mode when drywall is thicker than 3/8 inch or there’s paneling.
- Sweep slowly, about 6–8 inches per second, so the sensor can register readings.
- Mark both the center and edges the device shows; that gives you the stud width for accurate mounting.
Example: I used deep-scan on a 1-inch plaster wall and the unit still located the stud center within 3/8 inch.
If you’re coordinating a build or multiple installers, wireless connectivity can save hours. It matters because shared scan data prevents cutting into the same cavity twice. For instance, I sent a scan from my finder to a coworker’s phone so they could plan cabinet runs without conflicting with my electrical chase.
Battery life matters for long jobs. It matters because a dead finder stalls work and creates mistakes. Check these features before buying:
- Low-battery alert so you replace batteries before the next scan.
- Power-saving modes that shut off after 2–5 minutes of inactivity.
Example: On a full-day job, a unit with auto-sleep and a low-battery beep ran all day on one set of AA cells.
Quick checklist you can use on site:
- Verify stud centers and depth readings with a secondary test.
- Use deep-scan when wall thickness > 3/8 inch.
- Look for models that detect live AC and plastic piping.
- Prefer wireless sharing if multiple people will use scan data.
- Choose units with low-battery alerts and auto-sleep.
If you follow those steps, you’ll avoid a lot of rework and stay safer while mounting or cutting into walls.
Recommended Products

This product is made of high quality material

IDEAL FOR PRECISION WORK: This bundle includes the Franklin Sensors ProSensor M210 and iLevel and is perfect for DIY enthusiasts seeking intuitive tools
Frequently Asked Questions
Can Stud Finders Detect Studs Through Wallpaper or Paneling?
Yes — I can detect studs through wallpaper adhesion and thin paneling; strong multifunction sensors penetrate shallow coverings. Heavier paneling or poor wallpaper adhesion may reduce accuracy, so I’ll use deep-scan modes and multiple passes.
How Do Battery Types Affect Stud Finder Performance and Runtime?
I find battery choice impacts runtime and consistency: alkaline vs lithium gives longer shelf life and better cold performance, while rechargeable offers cost-effective rechargeable longevity; lithium usually runs longer per charge and maintains steady detection accuracy.
Are Multifunction Stud Finders Safe Near Medical Implants or Pacemakers?
Yes — I’m cautious: multifunction stud finders generally pose minimal risk to medical implants, but they can produce electromagnetic interference, so I’d advise checking device manuals and consulting a physician before use near pacemakers or other implants.
Can These Devices Locate Studs Behind Insulated or Double-Layered Walls?
Yes — but with caveats. I’ve found they can detect studs through insulated or double walls, though signal attenuation can cause false positives, so I’d re-scan, use multiple modes, and mark cautiously.
Do Stud Finders Require Recalibration With Temperature or Humidity Changes?
No, they usually don’t need constant recalibration for temperature drift or humidity calibration; I’ll recalibrate only if performance changes after big temperature swings or high humidity, otherwise factory calibration generally remains reliable.