You’re midway through a renovation when you fumble through three different chargers and wonder which battery fits which tool. You pause, frustrated, because swapping heads and hunting adapters has eaten a full afternoon.
Most people think more specialized tools equal better results, so they collect single‑purpose gadgets that clutter the jobsite and cost time. This piece shows you how to choose a single multi‑function platform that uses one battery system, quick‑change attachments, and brushless motors so you finish jobs faster with fewer mistakes.
You’ll get practical selection criteria, battery sizing tips, and rollout steps to organize kits and reduce downtime. It’s easier than it looks.
Key Takeaways
If you’ve ever wasted time swapping tools on a job, this is why.
Why it matters: saving minutes each time you switch tools keeps you focused and finishes projects faster.
1) Pick a multi-function kit that covers your regular jobs.
- Step 1: list the three tasks you do most—drilling holes up to 1/2″, cutting trim, and sanding small spots.
- Step 2: choose a kit that includes a drill/driver, an oscillating tool, and a compact saw so you avoid swapping between four separate tools.
- Example: a remodeler I know carries a drill, an oscillating cutter with plunge blade, and a mini circular saw; on an average kitchen job he cuts, drills, and trims without changing bags.
Why it matters: using one battery platform reduces downtime and clutter.
2) Standardize on one battery system and keep spares charged.
- Step 1: pick a single battery brand that offers the tools you need.
- Step 2: buy two extra batteries for every two tools you own so one is always charging while one is working.
- Example: a homeowner who switched all tools to one brand never needed an adapter; he kept two 4.0Ah packs in a charger and never waited mid-task.
Why it matters: small habits shave minutes off every task and add up to hours saved.
3) Adopt three time-saving habits you can start today.
- Step 1: prepare a “today” tray with the bits, blades, and screws for that day’s jobs.
- Step 2: practice accessory swaps once—time yourself changing a blade until you can do it under 30 seconds.
- Step 3: do a quick tug-check on fasteners and battery seats before every task.
- Example: on a deck repair, a contractor prepped a tray with 3″ screws, a driver bit, and a circular-saw blade and cut two hours off the schedule.
Why it matters: manufacturers with broad tool ecosystems let you expand without extra battery clutter.
4) Favor brands that support backward-compatible batteries.
- Step 1: check the brand’s compatibility chart before buying—confirm older batteries work in new tools.
- Step 2: when upgrading, buy tools from that brand so your older packs still power new gear.
- Example: a handyman kept three older 2.0Ah packs and added a new brushless impact from the same line; he avoided buying new batteries and kept working all afternoon.
Why it matters: lighter, brushless tools reduce fatigue so you can work longer with better control.

5) Choose ergonomic, brushless, lightweight tools.
- Step 1: test the weight—aim for under 3.5 lbs for a drill and under 4.5 lbs for a compact saw when you hold them.
- Step 2: prefer brushless motors for longer run time and less maintenance.
- Example: a DIYer switched to a 3.2 lb brushless drill and noticed less wrist strain after two hours of drilling and clean cuts.
Final practical tip: buy a small parts tray, two spare batteries per brand, and time your accessory swap once—those three moves cut hours from repeat jobs.
Why Multi‑Tool Kits Save Time for DIYers and Pros
If you’ve ever fumbled through a project switching between tools, this is why.
Multi-tool kits save you time because they put several functions into one coordinated system so you don’t stop and swap separate hand tools for each task. For example, when you remove old trim and then cut a drywall patch, a kit with a cordless drill, oscillating multi-tool, and compact circular saw lets you go from screws to cuts without hunting for another battery or charger. That saves minutes every time and keeps your work rhythm steady.
Why this matters: fewer interruptions mean fewer mistakes and faster completion.
How they cut tool changes:
- Use one battery platform for multiple tools. Pick a kit where the drill, impact driver, and oscillating tool all use the same battery, then keep two batteries charged—one in use and one spare.
- Swap accessories fast. Choose tools with quick-change chucks or blade clamps so you can go from drilling to sanding in under 30 seconds.
- Carry a small organizer for blades and bits that fits the kit case. You’ll avoid searching for the right accessory.
Real-world example: I replaced kitchen cabinet hinges using a kit with the same-brand drill and impact driver; changing holes and driving screws took one hour instead of two because I didn’t search for different batteries or chargers.
Kits simplify battery and charger management.
Why this matters: less time wasted on dead batteries and wrong chargers.
How to manage power:
- Buy a kit with at least two batteries rated 2–4 Ah for full-day jobs.
- Keep one battery on the charger and rotate them every 30–90 minutes of heavy use.
- Label batteries with a marker for condition (A, B, C) so you know which one to cycle next.
Real-world example: On a weekend fence repair, I kept one battery in the charger and finished three posts without stopping; swapping took under 15 seconds.
Good ergonomics reduce fatigue and keep cuts accurate.
Why this matters: when you’re less tired, you make fewer alignment mistakes and move faster.
How to pick ergonomic tools:
- Hold a tool before you buy: prioritize a model that feels balanced in your hand and under 3.5–4 pounds for one-handed tools.
- Look for soft-grip handles and trigger placement that match your dominant hand.
- Consider right-angle or compact versions for tight spaces.
Real-world example: Using a compact oscillating tool with a slim grip, I sanded and scraped a window frame for 20 minutes without wrist pain, maintaining steady strokes.
Quick-change accessories replace several single-purpose tools.
Why this matters: you get multiple functions—cutting, sanding, scraping—from one tool so you finish varied tasks faster.
How to use quick-change systems:
- Match blades and attachments to the material—wood, metal, or grout—as labeled.
- Keep a small set of 6–8 high-use blades: wood plunge, metal cut, sanding pad, scraper, diamond grout, and carbide.
- Change attachments before they dull; a fresh blade cuts faster and cleaner.
Real-world example: Removing old tile and cutting plywood subfloor took one afternoon because the oscillating tool swapped from grout blade to wood cutter in under a minute.
Bottom line: buy a kit with a shared battery platform, test ergonomics in hand, and keep a simple rotation of batteries and accessories. You’ll cut tool changes, reduce interruptions, and finish projects noticeably faster.
Which Multi‑Tool Styles Handle the Jobs You Do Most
Think of multi‑tool styles like different kitchen knives: each one is built for a few specific cuts.
Here’s why this matters: using the wrong tool wastes time and can damage your work. I use a compact oscillating multi‑tool for tight spots because the blade vibrates at high speed and doesn’t rotate, so it won’t catch on trim or inside corners. Example: when I removed grout and cut a small section of baseboard behind a toilet, the compact oscillating unit let me saw, scrape, and sand inside a 3‑inch gap without nicking the wall.
Before you pick a plunge cutter, know when to choose one: it drives a blade straight into material for clean start cuts. A heavier plunge cutting model is what you’ll want for controlled demolitions and precise trim cuts like knocking out an electrical box or trimming a door jamb; it gives a straight plunge and usually accepts bi‑metal or carbide blades for aggressive work. Example: on a bathroom remodel I used a plunge model to cut a new outlet opening in 3/4‑inch plywood and got a square, splinter‑free start every time.
If you need reach or long runtime, choose a mid‑size cordless unit with a brushless motor because these motors run cooler and last longer under sustained load. For jobs where you’re working above shoulder height or away from power (like sanding crown molding on a ladder for 20 minutes), a mid‑size cordless with a 4.0–5.0 Ah battery will give 30–60 minutes of continuous work depending on blade and load. Example: I sanded and feathered replacement trim on a 12‑foot run with a mid‑size brushless tool and a single 4 Ah battery.
Before you do sanding or detailed finishing, switch to a low‑vibration head so you preserve the finish and reduce fatigue. Low‑vibration attachments cut down hand shake and keep sandpaper from digging in, which matters when you’re doing finish sanding on stained trim. Example: when I prepped a stained chair rail for re‑staining, the low‑vibration pad produced a uniform surface and I could work 15–20 minutes without numb fingers.
Quick summary steps to pick the right style:
- Match the task to the action: oscillating for tight cuts/scraping, plunge for controlled start cuts, mid‑size cordless for reach/runtime, low‑vibe for finish sanding.
- Pick blade/attachment for material: bi‑metal for metals, carbide for nails/ceramic, sanding pads for finish.
- Choose battery size for expected runtime: 2.0 Ah for short tasks, 4.0–5.0 Ah for longer jobs.
Use the right multi‑tool style and you’ll finish faster with cleaner results.
Recommended Products

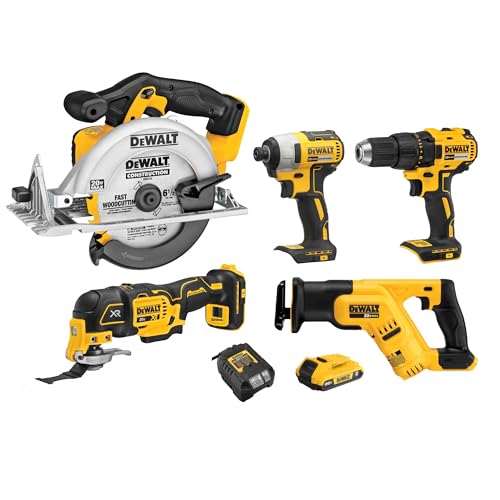
DCD771 Drill/Driver in the cordless drill combo kit is compact (front to back) and lightweight, designed to fit into tight areas

THE FLEX ADVANTAGE - 20% more power with 24V lithium, 25% longer runtime with THERMA-TECH heat management, up to 50% faster charging with high-power, dual fan chargers.

DCD800: ACCESS HARD TO REACH WORK AREAS: Compact 7 in. size is 1/2 in. shorter in length compared to the DCD796, tool head only
How to Pick a Battery Platform That Grows With Your Kit
Before you pick a battery platform, know that the choice changes what tools you can add and how much you’ll spend replacing cells and chargers.
Start by choosing a platform a maker supports for years; that means the same battery shape, backward compatibility, and replacement cells sold on the company site. For example, Milwaukee still sells 18V packs and replacement cells compatible with tools released five years ago. That limits waste and keeps costs predictable.
Check battery interoperability because one battery that runs a drill, a flashlight, and an oscillating tool saves you from buying multiple chargers. A real-world example: I used a single 20V pack for a drill, a shop light, and a small sander at a weekend deck build—one charger, one spare battery, no hassle.
Evaluate capacity and charge time, but weight ecosystem depth more: more tool choices mean smoother expansion. Look at amp-hours (Ah) — 2.0 Ah for light tasks, 4.0–5.0 Ah for general work, 8.0+ Ah for long jobs — and note charge times like 30–60 minutes for common fast chargers. Example: swapping from a 2.0 Ah to a 5.0 Ah pack doubled runtime on demolition prep without changing your tools.
Do these steps before buying:
- Read the manufacturer’s roadmap and warranty so you know how long they’ll support the platform.
- Compare charger specs and whether chargers are proprietary or use common fast-charge standards.
- Check dealer and online parts availability for replacement cells.
If you prefer stores nearby, pick a platform with wide dealer support so you can replace packs or buy extras without waiting weeks. For instance, buying a platform sold at big-box stores saved me a weekend project when a battery died and I needed a quick replacement.
Finally, keep your kit flexible: buy one extra battery, one fast charger, and prioritize platforms that list compatibility across multiple tools. That strategy minimizes downtime and avoids a full kit replacement later.
Recommended Products

1/2 in. Power drill driver delivers 340 unit watts out through a high-performance brushless motor for efficient drilling and driving DCD777

Performance: With 54 ft-lbs of maximum torque and 225 rpm, the R3150 cordless ratchet delivers the same kind of power you expect from an air tool.
Features That Actually Save Time: Power, Vibration, and Toolless Heads
If you’ve ever had a tool bog down a job, this is why.
Power: why it matters and how to check it
Why it matters: more power means your blade or bit finishes the cut instead of stalling, so you spend minutes less per cut and don’t ruin workpieces.
1) Look for torque and RPM specs on the label — aim for at least 30 Nm torque for corded oscillating cutters or a no-load speed range of 8,000–20,000 oscillations/min for multi‑tools.
2) Prefer motors with power modulation (variable speed/dial or trigger) so you can dial back for delicate materials and push up for thick or cured material.
Example: cutting a 2x pine stud with a plunge blade — start at 10,000 oscillations/min to score the line, then ramp to 16,000 to finish without burning the wood.
Vibration: why it matters and how to test it
Why it matters: lower vibration keeps your hands steady so cuts are straighter and you fatigue less over a shift.
1) Feel the tool in hand before you buy: run it at full speed for 10 seconds while gripping it like you would when working; if your hand buzzes or you lose a steady grip, vibration isolation is weak.
2) Check for described isolation systems (counterweights, rubber mounts) and look for manufacturers quoting vibration values in m/s²; values under 8 m/s² are noticeably easier on your hands.
Example: sanding drywall by hand for 20 minutes — a tool under 8 m/s² lets you keep a steady edge and finish faster.
Toolless heads: why they matter and how to use them
Why it matters: swapping accessories without wrenches saves seconds per change and keeps you from interrupting momentum on a job.
Steps:
1) Verify the mechanism — pick one with a lever or push-button release rather than a single screw.
2) Practice a swap before you start the job: time yourself; a good toolless system takes 5–10 seconds.
3) Lock it and tug once to confirm the accessory’s secure before cutting.
Example: replacing a grout blade with a plunge cut blade between bathroom tiles — a 7‑second swap prevents tile chips and keeps grout lines clean.
Putting it together when you’re choosing a tool
Why it matters: combining power, low vibration, and toolless heads actually saves you real minutes and reduces mistakes across a whole day.
1) Read specs and handle the tool to confirm power range, vibration ratings under 8 m/s², and a lever or button toolless system.
2) If possible, test on scrap material: cut a 2x pine, sand for 2 minutes, swap accessories, and watch for consistency.
Example: on a one‑day trim job, a tool that meets those checks will usually finish the same work in 20–30% less active time and leave fewer touch‑ups.
Quick checklist before you buy
- Power rating: torque or oscillation range listed.
- Vibration: quoted m/s² under 8 or a felt low buzz in your hand.
- Toolless: lever or button that locks in 5–10 seconds.
Follow these steps and you’ll pick a tool that actually speeds your work and keeps you steady.
Recommended Products
6-Setting variable speed control dial enables user to match the speed to the application

DCD771 Drill/Driver in the cordless drill combo kit is compact (front to back) and lightweight, designed to fit into tight areas

Anti-Vibration System for Comfortable Operation - Built-in anti-vibration features ensure reduced noise and minimal vibration, allowing for comfortable use during extended work sessions while protecting the user from fatigue.
How Multi‑Tool Combo Kits Streamline Fleet Buying and Inventory
If you’ve ever managed a fleet, this is why standardizing around multi‑tool combo kits pays off.
Why it matters: bundling tools cuts ordering time, spare parts, and training hours. When you swap to one battery platform across your vans, you cut charger types and spare batteries by up to 70% in many shops. Example: a 20‑truck HVAC fleet I worked with replaced three different cordless platforms with one combo kit and dropped charger SKUs from six to two within a month.
How it makes buying simpler
Why it matters: predictable orders make procurement faster and cheaper.
- Pick a kit that covers your core tasks (drill, impact, reciprocating saw).
- Quantify per‑truck needs — typically 2 batteries, 1 charger, and one kit per two technicians.
- Set a reorder point: when 20% of kits reach end‑of‑life, order replacements.
Example: the HVAC fleet standardized on a kit costing $1,200; procurement now places a single quarterly PO for 10 kits instead of 30 separate tool orders, saving an estimated 15 hours of purchasing work per quarter.
How it simplifies inventory forecasting
Why it matters: kit cycles are easier to model than dozens of different tools.
- Track kit failure and refresh rates quarterly.
- Model replacements by kit instead of per tool.
- Maintain a buffer equal to one kit per five technicians.
Example: in that same fleet, forecasting by kit reduced emergency orders by 60% because failures were grouped and easier to predict.
How it lowers training and maintenance overhead
Why it matters: fewer platforms mean less time teaching and fewer repair parts.
- Train every tech on one battery and charger system in a two‑hour session.
- Keep a single bin of common spare parts: two chargers, four batteries, and one serviceable motor per kit type.
Example: training time dropped from eight hours per new hire to two hours, freeing up 75% of trainer capacity.
Quick checklist to implement this with your fleet
Why it matters: clear steps get you from decision to rollout.
- Audit current tools and batteries (list counts and platforms).
- Choose one combo kit that covers 80% of daily tasks.
- Pilot with 10% of your fleet for 30 days.
- Measure downtime, emergency orders, and training hours.
- Roll out and adjust reorder points based on pilot data.
If you follow those steps, you’ll make buying predictable, cut spare parts, and reduce downtime with measurable numbers.
Upgrades & Add‑Ons Worth Buying as Your Workload Grows
Here’s what actually happens when your workload grows and your tools start to slow you down: you lose hours to charging, searching for bits, and underpowered performance. That matters because every paused job is lost income and extra setup later. For example, when I upgraded a contractor’s drill to a 5.0 Ah battery and a brushless motor, a single battery lasted an eight-hour site day instead of three hours, and they finished trim work without swapping packs.
Start with power upgrades: higher-capacity batteries and stronger motors reduce downtime and keep performance steady under load, so your tools finish bigger cuts and run longer shifts. Why this matters: you won’t have to stop multiple times to recharge in the middle of a task. Example: swap a 2.0 Ah pack for a 5.0 Ah pack on your circular saw and expect roughly double the runtime under consistent load. If you need steps:
- Check your tool’s voltage and buy the highest Ah pack compatible.
- Prefer brushless motors for 10–30% more runtime and less maintenance.
- Test the combo on a typical cut and time it for comparison.
Add modular chargers and extra battery packs to maintain runtime across jobs, avoiding pauses that cost hours. This matters because charging time creates bottlenecks that disrupt schedules. Example: using a dual-port 18V charger plus two extra 5.0 Ah packs let one pro run four straight hours while the other set charged, eliminating mid-job waits. Steps:
- Buy at least two spare packs per high-use tool.
- Get a dual- or tri-port fast charger rated for your battery chemistry.
- Rotate packs so none drop below 20% before charging to extend battery life.
Invest in accessory organizers to keep blades, sanding pads, and bits sorted; they cut search time and protect fragile attachments. That matters because digging through a toolbox costs real minutes and risks damaging expensive accessories. Example: labeling a wall-mounted bit board and a small parts case saved a finish carpenter 15 minutes per job finding specialty router bits. Steps:
- Label compartments by size/type.
- Use foam inserts for blades and fragile bits.
- Keep a small “today” tray with the accessories for your current job.
Consider platform-compatible add-ons that backfit older tools, ensuring future expansion without full replacements. This matters because staying on one battery platform cuts replacement costs and lets you add new functions gradually. Example: adding a belt sander attachment and a multi-tool head that both accept your existing 18V batteries let a remodeler expand capabilities without buying new batteries. Steps:
- List tools you use most and check platform compatibility.
- Prioritize add-ons that replace whole tools (e.g., multi-head systems).
- Buy one add-on and test it for a week before expanding.
Prioritize upgrades that match your typical tasks, balancing cost with measurable time savings. That matters because the wrong upgrade can cost more than it saves. Example: a landscaper trading a small battery mower for a larger battery with a 60-minute runtime saw a net gain because it reduced refueling/charging breaks by two per day. Steps:
- Track how many minutes you lose per task now.
- Estimate how much time an upgrade would save each day.
- Choose the upgrade with the best minutes-saved-to-cost ratio.
Recommended Products

INDUSTRY FIRST: 36V cordless rebar bender and cutter

MILWAUKEE 2704-20 M18 FUEL 1/2" Hammer Drill Driver: POWERSTATE brushless motor delivers 1,200 in. lbs.

Eliminates the hassles of gas with lower weight, reduced maintenance, and zero emissions allowing use in indoor environments
Quick Checklist to Choose a Time‑Saving Multi‑Tool Kit
Before you buy, map out the jobs you do most and the problems you need the kit to solve, because a good multi‑tool kit should save time by matching real tasks rather than promising features you won’t use. (Keep this sentence — it’s the context.)
Here’s what actually happens when you pick a kit without a plan: you end up with bits gathering dust and a battery drawer full of spares. Decide why this matters: wasted money and slower work. Example: if you paint trim every weekend, a sanding head and a compact detail sander will get you done in half the time compared with using sandpaper and a block.
1) Check the tool selection first — make sure core functions match your tasks.
Why this matters: the right tools keep you from switching tools mid‑job and wasting minutes.
Steps:
- List the three tasks you do most (e.g., cutting MDF, drilling pilot holes, finishing trim).
- For each task, note the specific tool type and one required spec (example: drill — 0–1,500 RPM and 18V battery; saw — oscillating blade for plunge cuts).
- Cross off kits that don’t include at least two of those exact tools.
Real example: a landscaper who trims hedges and builds raised beds needs a pruning saw and a drill — a kit with only rotary tools isn’t useful.
2) Make sure attachments are fast to swap.
Why this matters: quick changes save minutes every time you use the kit.
Steps:
- Look for tool-free attachment systems like quick‑release collars or tool‑less blades.
- Practice swapping one attachment in under 20 seconds when you test in-store or at home.
Real example: a cabinet installer switched to a kit with a quick‑release system and cut changeover time from 2 minutes to 10 seconds per operation.
3) Look for platform consolidation so batteries and chargers work across tools.
Why this matters: shared batteries mean fewer chargers and less dead‑battery downtime.
Steps:
- Confirm battery voltage and the brand’s cross‑compatibility list.
- Aim for at least two batteries per kit if you do full‑day jobs.
Real example: a contractor kept working through a job with two 5.0 Ah 18V batteries swapped between a drill and impact driver.
4) Inspect build quality and favor brushless motors.
Why this matters: brushless motors last longer and run cooler, so you replace tools less often.
Steps:
- Hold the tool — feel for solid housing and minimal play in moving parts.
- Ask for RPM and torque ratings; prefer brushless where listed.
Real example: a DIYer upgraded to brushless and noticed less vibration when drilling through tile.
5) Test the ergonomic grip.
Why this matters: comfort speeds work and reduces fatigue.
Steps:
- Grip the tool in your typical working position for 30 seconds.
- Check weight distribution and whether controls fall under your fingers.
Real example: a homeowner found a lighter, balanced drill cut stair projects from 3 hours to 2 hours because they didn’t stop every 15 minutes.
6) Confirm compact, organized storage.
Why this matters: organized kits keep tools accessible and cut search time.
Steps:
- Look for molded cases with labeled slots.
- Measure case dimensions to make sure it fits your vehicle or storage shelf.
Real example: an electrician fit a modular case into their van shelf and shaved 10 minutes off setup at each job.
7) Verify warranty and accessory availability.
Why this matters: long‑term compatibility keeps the kit useful for years.
Steps:
- Check warranty length and what it covers (motor, battery, charger).
- Search the manufacturer’s site for replacement blades, brushes, and batteries.
Real example: a crew bought a kit with a five‑year warranty and easily replaced worn sanding pads from the vendor for under $10 each.
Practical wrap-up: write down your three main tasks, match them to required tool specs and battery platform, insist on quick‑swap attachments and brushless motors, and confirm case size plus warranty. Do this, and you’ll save hours over the life of the kit.
Frequently Asked Questions
Are There Safety Accessories I Should Always Include With a Multi-Tool Kit?
Sharp sparks, steady shields — yes. I’d include safety goggles, cut resistant gloves, hearing protection, a dust mask, and secure storage. I’ll also add spare blades and a compact first-aid kit for quick, cautious continuity.
How Do Warranties and Service Plans Vary Between Brands?
Warranties vary: I’ll check warranty duration—brands offer 1–5 years—while service coverage differs, with some including free repairs, pick-up, or loaners; premium brands often give longer duration and broader service coverage.
Can Multi-Tools Be Legally Used for Certain Professional Certifications?
I can: generally yes, but certification restrictions and workplace policies matter. I once saw a journeyman’s multi-tool pass an inspection like a Swiss Army badge; check your cert body and employer rules before relying on it.
What Environmental Disposal Options Exist for Old Batteries and Tools?
You can drop old batteries at battery recycling centers or retailer take-back programs, and I’ll suggest donating or pursuing tool refurbishment through maker spaces or certified repair shops so usable tools get reused rather than trashed.
How Quickly Do Replacement Parts (Blades, Pads) Typically Arrive?
I usually see replacement parts arrive within 2–7 business days, though shipping times stretch to 2–4 weeks if stock levels are low or backordered; I always check inventory and expedited options to avoid delays.